

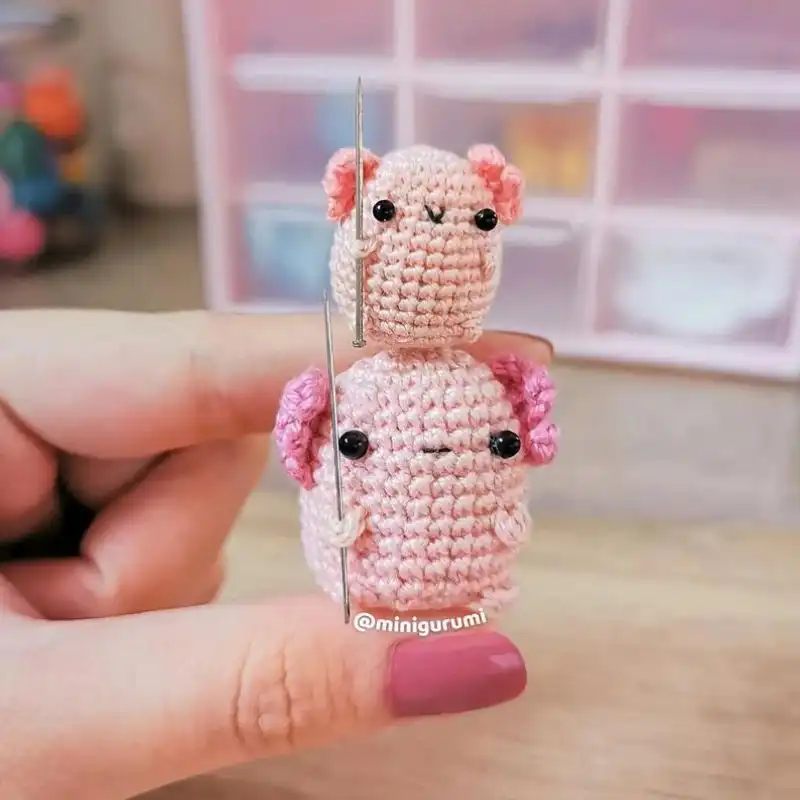
Amigurumi is one of the hottest trends taking the crochet world by storm! Amigurumi was first developed in Japan and is a method of crocheting small yarn figurines.
The word ‘Amigurumi’ is a portmanteau of two distinct Japanese words. ‘Ami’ refers to the act of crocheting, and ‘Kurumi’ refers to stuffed dolls.

These popular crochet buddies have quickly become popular since they were introduced to the Western World, thanks to their adorable appearance their handmade nature. Amigurumi is an incredibly rewarding activity to get involved in, but the hardest part is figuring out where to start.
The cute figurines of Amigurumi look deceptively simple, but they can be quite difficult to do right if you don’t have a good guide or a reference to work off of.
What Is Amigurumi?
Amigurumi is a Japanese art form that crafts small, stuffed yarn creatures or objects through knitting or crocheting techniques.
The term “amigurumi” derives from the Japanese words “ami,” meaning knitted or crocheted, and “nuigurumi,” meaning stuffed doll. This technique creates unique three-dimensional designs, typically anthropomorphic creatures or cartoonish characters.
Commonly made from yarn, each amigurumi piece has distinct features often meticulously crafted to create a cute, appealing look, embodying the Japanese aesthetic of “kawaii” or cuteness. Amigurumi can be simple or complex, depending on the design, and has become a popular craft worldwide.
Popularity & Versatility Of Amigurumi Toys
Amigurumi toys have gained massive global popularity due to their distinct, cute aesthetic and the creative freedom they offer. Their versatility lies in their limitless design potential.
They can virtually take any form, making them a hit across different age groups and cultures. This versatility extends to their use too: they can be used as decorative items, gifts, or educational toys, for instance.
Their appeal transcends the realm of toy making, becoming a genuine art form. Many artisans and hobbyists have embraced Amigurumi, showcasing their creations at craft fairs and online platforms. Additionally, they’ve become common in pop culture, mirroring characters from movies, books, and video games.
The therapeutic aspect of crafting these toys has also contributed to their popularity. Making amigurumi toys involves focus, patience, and creativity, providing a mindful, stress-relieving activity.
The accessibility of the craft has boosted its fame. With readily available materials, various tutorial resources online, and a supportive community of crafters, anyone can begin their journey of creating their amigurumi toys.
Essential Tools & Materials
- Yarn: This is the primary material for making Amigurumi. The type and thickness of the yarn can vary based on the desired outcome. Acrylic and cotton yarns are commonly used.
- Crochet Hooks: The hook size should correspond with the thickness of the yarn you’re using. Smaller hooks typically create tighter stitches, ensuring stuffing doesn’t peek out.
- Stuffing: Polyester fiberfill is commonly used for stuffing Amigurumi. It’s lightweight, washable, and holds its shape well.
- Stitch Markers: These are vital to keep track of rounds in Amigurumi, as most Amigurumi are worked in a continuous spiral.
- Yarn Needle: A large-eye blunt needle is needed to sew parts together and weave in loose ends.
- Scissors: A good pair of scissors is necessary for cutting yarn.
- Safety Eyes: These are used to create eyes for your Amigurumi, though they can also be embroidered.
- Embroidery Thread: This creates details like facial features or patterns.
- Ruler or Tape Measure: This helps check the size of your work or measuring parts to ensure symmetry.
Popular Stitches To Crochet An Amigurumi
Amigurumi is a Japanese art of knitting or crocheting small, stuffed yarn creatures or objects. Here are some of the basic stitches you’ll commonly see in amigurumi crochet patterns:
- Chain Stitch (ch): The chain stitch is the foundation for your amigurumi piece. You’ll often make a chain to start, equivalent to a single strand of yarn linking loops.
- Slip Stitch (sl st): The slip stitch is mainly used to join rounds or rows or move your yarn to another position without adding height. It creates a flat, tight stitch.
- Single Crochet (sc) is amigurumi’s most essential and commonly used stitch. Single crochet provides a tight fabric, essential for stuffed toys to prevent the filling from spilling out.
- Half Double Crochet (hdc): This stitch is taller than a single crochet but still quite dense. While less common in traditional amigurumi, it’s sometimes used for specific shaping or texturing.
- Double Crochet (dc): Double crochet stitches are taller and create a looser fabric. Because of the looseness, these are less common in amigurumi but can be used for specific design elements.
- Increase (inc): Increasing involves two single crochets in the same stitch. It is vital for shaping your amigurumi, particularly for rounding forms like heads or bodies.
- Decrease (dec) or Single Crochet Decrease (sc2tog): Decreasing combines two stitches into one and is essential for shaping. The “single crochet two-together” technique is the most common way to decrease amigurumi.
- Magic Ring or Magic Circle: The magic ring is a technique used to start a round shape with no hole in the center. This is particularly useful for amigurumi heads, bodies, and other round shapes.
- Invisible Decrease (inv dec): This specialized decrease is less noticeable than a standard sc2tog. It’s often used in amigurumi to make the decreases less visible.
- Bobble Stitch: Though not essential, the bobble stitch is sometimes used in amigurumi for textural interest, like creating small protrusions for noses or other features.
Glossary Of Common Crochet Stitches And Techniques
- Chain (ch): The most basic crochet stitch begins with a simple loop and continues with a series of loops.
- Slip stitch (sl st): A simple stitch used to join work in the round or to move yarn across a group of stitches without adding height.
- Single crochet (sc): The most common crochet stitch in Amigurumi. You insert the hook, yarn over, pull through, yarn over again, and pull through both loops on the hook.
- Half Double crochet (hdc): A stitch taller than a single crochet but shorter than a double. It involves yarning over before inserting the hook into the stitch.
- Double Crochet (dc): This taller stitch is created by yarning over, inserting the hook into the stitch, yarning over and pulling through, yarning over and pulling through two loops, then yarning over and pulling through the final two loops.
- Treble Crochet (tr): A tall stitch involving two yarn overs before inserting the hook.
- Magic Ring or Circle: This technique is often used to start Amigurumi, creating a tightly closed center instead of a hole.
- Increase (inc): An increase is simply two crochet stitches in the same stitch. In Amigurumi, increases help to shape the piece.
- Decrease (dec): Also known as “crochet two together,” a decrease combines two stitches into one and is used to shape the Amigurumi.
- Invisible decrease (inv dec): A way of decreasing that looks less bulky and noticeable. It involves only going through the front loops of the two stitches you combine.
- Fasten Off (FO): Securing your yarn after completing your crochet piece.
- Work in the Round: Amigurumi is typically worked in the round, meaning you work in spirals without joining the beginning and end of each row.
- Front Loops and Back Loops (FLO/BLO): Each stitch has two loops at the top. Patterns might specify to crochet into the front loop only (FLO) or back loop only (BLO), which creates different textures and shapes.
Understand Crochet Stitches & Techniques
Understanding crochet stitches and techniques takes practice and familiarity with the terminology. Here are some steps to help you get started:
- Learn the Basic Stitches: Start with the basic stitches like the chain stitch, slip stitch, and single crochet. Practicing these stitches will help you understand the process of yarn over, inserting the hook, and pulling through loops.
- Understand the Pattern Language: Familiarize yourself with the abbreviations used in crochet patterns. Look for a glossary or legend in the design, or refer to online resources.
- Follow Tutorials: Many online tutorials provide step-by-step guides on crochet stitches and techniques, often including photos or videos. These can be extremely helpful in understanding the process visually.
- Practice Increasing and Decreasing: For Amigurumi, understanding how to increase (making two stitches into one) and decrease (combining two stitches into one) is crucial as these techniques shape your creation.
- Understand Working in Rounds: Most Amigurumi are crocheted in the round, meaning you work in a continuous spiral without turning your work.
- Use Stitch Markers: Stitch markers can help you track where each round begins, especially when working in the round. They can also be useful for marking increase or decrease points.
- Try the Magic Ring: The magic ring or circle is a common technique to start Amigurumi. It can be tricky initially, but it is worth learning for a tight, hole-free start.
- Learn to Read Crochet Diagrams: Some patterns include stitch diagrams and visual design representations. These can help you visualize the finished product and the process of getting there.
- Practice Regularly: Like any new skill, practice is key. The more you crochet, the more comfortable you’ll get with different stitches and techniques.
Which Yarn Is Best For Crochet Amigurumi?
The yarn choice for Amigurumi largely depends on the desired texture and size of your finished project and your preference. However, there are a couple of types of yarn that are commonly recommended:
Acrylic Yarn: Acrylic yarn is popular for its durability, affordability, and various colors. It’s also easy to clean, a bonus for toys needing washing.
Cotton Yarn: Cotton yarn is another good option. It’s soft and has a nice, smooth texture that’s perfect for Amigurumi. It’s also sturdy, holds its shape well, and gives your finished project a clean look.
Generally, using medium-weight yarn (worsted, Aran, or 10-ply) for Amigurumi is recommended. This weight strikes a good balance between sturdy and easy to work with.
Also, remember to consider the yarn’s texture. Smooth yarns are typically easier to work with and yield more defined stitches, which is usually desirable for Amigurumi.
Sticking to solid, light colors can also be helpful for beginners since it’s easier to see your stitches. As you gain more experience, you can experiment with different weights, types, colors, and even variegated or self-striping yarns to add character to your amigurumi creations.
RELATED: 61 Free Fantastic Purse Crochet Patterns (Including Pictures)
How Much Yarn Do I Need To Crochet Amigurumi?
The amount of yarn needed to crochet an amigurumi toy depends on several factors: the size of the toy you’re planning to create, the stitch density, the weight of the yarn, and the crochet hook size. Here are some general guidelines:
- Small Amigurumi (around 3-5 inches): Typically require less than one skein of yarn (around 50-100 yards).
- Medium Amigurumi (around 6-9 inches): This may require one to two skeins of yarn (around 100-200 yards).
- Large Amigurumi (10 inches and above): This can require several skeins of yarn (200 yards or more).
If you’re following a pattern, it should provide an estimated amount of yarn needed. If it doesn’t, and you’re unsure, it’s always better to overestimate and buy a little extra, especially if you’re matching specific colors. A little leftover yarn isn’t a problem and can be useful for future projects or repairs.
What Is An Ideal Size For Amigurumi?
Amigurumi can vary significantly in size depending on the intended use, the yarn and hook used, and the personal preference of the creator. Here’s a breakdown of some typical sizes:
Miniature (2–4 inches): These tiny amigurumi are often used as keychains or small ornaments. Due to their small size, they’re relatively quick to make but can be challenging due to the fine yarn and small hooks required.
Small (5–7 inches): Small amigurumi are convenient for gifting and travel. They are often used as small toys or decorations. These sizes are also great for those new to the craft who want to complete a project quickly.
Medium (8–12 inches): This is a common size for stuffed toys and decorative pieces. They are large enough to be cuddly but not too large to be unwieldy. This size also allows for a good amount of detail in the design.
Large (13–18 inches): Large amigurumi make great cuddle companions or pillows. They can be quite detailed and satisfying but take a lot of time and yarn.
Extra Large (Over 18 inches): These specialty amigurumi serve as statement pieces, often used for display. They require a lot of time, skill, and materials and may need to be more practical for everyday use, but they are striking.
The ideal size for amigurumi depends on its intended use and the creator’s and recipient’s preferences:
- For Children: Medium to large sizes are often ideal for children to cuddle and play with, provided all elements are securely attached to meet safety standards.
- For Display: Smaller sizes are usually more appropriate if the amigurumi is meant to sit on a shelf or decorate a room.
- For Practical Use: If you’re making an amigurumi pillow, for example, then a large or extra-large size would be most suitable.
- Skill Level: Beginners might find smaller projects less daunting, while experienced crocheters might enjoy the challenge of a larger, more detailed piece.
Is It Beginner Friendly?
Yes, Amigurumi can be beginner-friendly. While the art of Amigurumi might look complex, it usually involves repeating a series of basic crochet stitches, which are quite simple once you get the hang of them.
Starting with simpler patterns can help beginners learn the basic techniques, including how to crochet in the round, increase and decrease stitches, and assemble parts, all of which are essential skills in Amigurumi.
As you become more comfortable with these techniques, you can start working on more complex designs and experimenting with different types of stitches and yarns.
Moreover, there are numerous online resources, including step-by-step tutorials, video demonstrations, and beginner-friendly patterns, which can be immensely helpful for newcomers to the craft. Joining crochet or amigurumi communities online can also provide support, advice, and inspiration.
How To Crochet An Amigurumi Cactus?
Crocheting an amigurumi cactus can be a fun and relatively simple project. Here is a beginner-friendly guide to making your cactus. I’ll use standard US crochet terms for the instructions.
Materials Needed
- Green yarn for the cactus
- A small amount of brown yarn for the pot
- Crochet hook (Size to match your yarn; a typical choice might be a 4.0mm or 5.0mm hook)
- Fiberfill stuffing
- Yarn needle for sewing
- Optional: Small flower or other decoration
Abbreviations
- ch: chain
- sc: single crochet
- sl st: slip stitch
- inc: increase (two sc in one stitch)
- dec: decrease (sc two stitches together)
- st(s): stitch(es)
Instructions
Cactus Body
Start With Green Yarn
- Make a magic ring, or ch 2, and work into the second chain from the hook.
Round 1:
- 6 sc into the magic ring. (6 sts)
- Tighten the ring if you use a magic circle.
Round 2:
- inc in each st around. (12 sts)
Round 3:
- sc in next st, inc in next st repeat around. (18 sts)
Rounds 4-8:
- sc in each st around. (18 sts)
- You’re creating the height of the cactus here.
Round 9:
- sc in next st, dec repeat around. (12 sts)
Add Stuffing
- Lightly stuff the cactus body with fiberfill at this point.
Round 10:
- dec in each st around. (6 sts)
Close and Fasten Off
- Add any additional stuffing needed.
- Cut the remaining yarn and leave a long tail.
- Next, start weaving the tail with a yarn needle through the remaining 6 stitches and pull tight to close.
Pot
Start with Brown Yarn
- Make a magic ring or ch 2.
Round 1:
- 6 sc into the magic ring. (6 sts)
Round 2:
- inc in each st around. (12 sts)
Round 3:
- sc in next st, inc in next st repeat around. (18 sts)
Rounds 4-6:
- sc in each st around. (18 sts)
Fasten Off
- Sl st in the next st and cut the yarn, leaving a long tail for sewing.
Assembly
Sew the Cactus into the Pot
- Using the long tail from the cactus, sew it into the center of the pot.
Add Optional Decorations
- You can sew on a small crochet flower, a button, or other decoration.
36 Trendy Crochet Amigurumi Patterns
There are so many Amigurumi patterns out there, so let’s take a look at 36 of the best ones that you can try out today, to create your own Amigurumi figures!
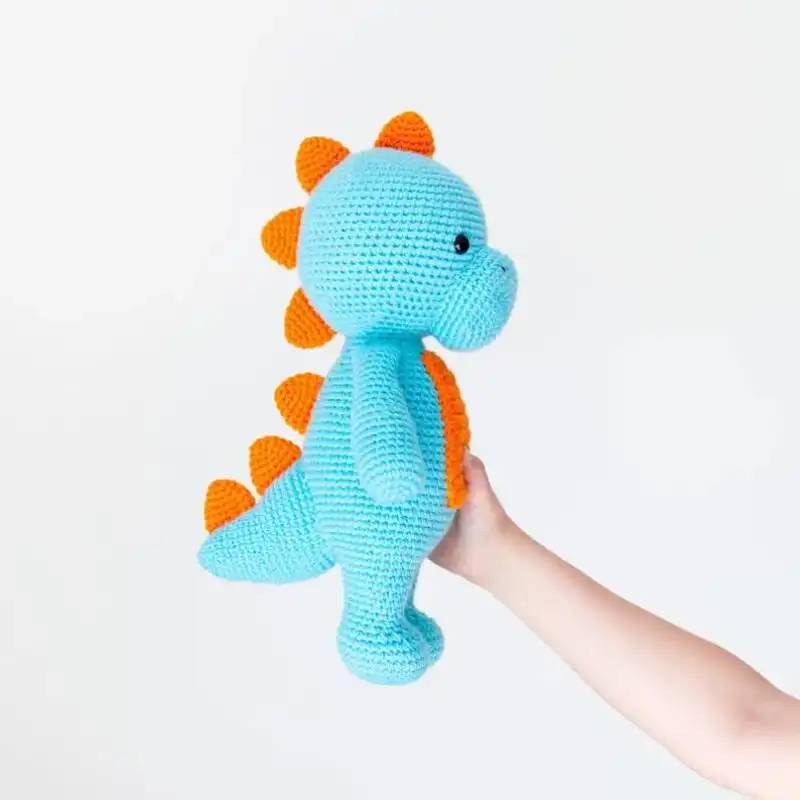
1. Bronto The Dinosaur
This adorable little dinosaur friend is perfect for a beginner crocheter who wants to dip their toes in the world of Amigurumi. These small dinosaurs would also make for a great gift for a friend or family member, and a great way to show off your newly developed talent at the same time!
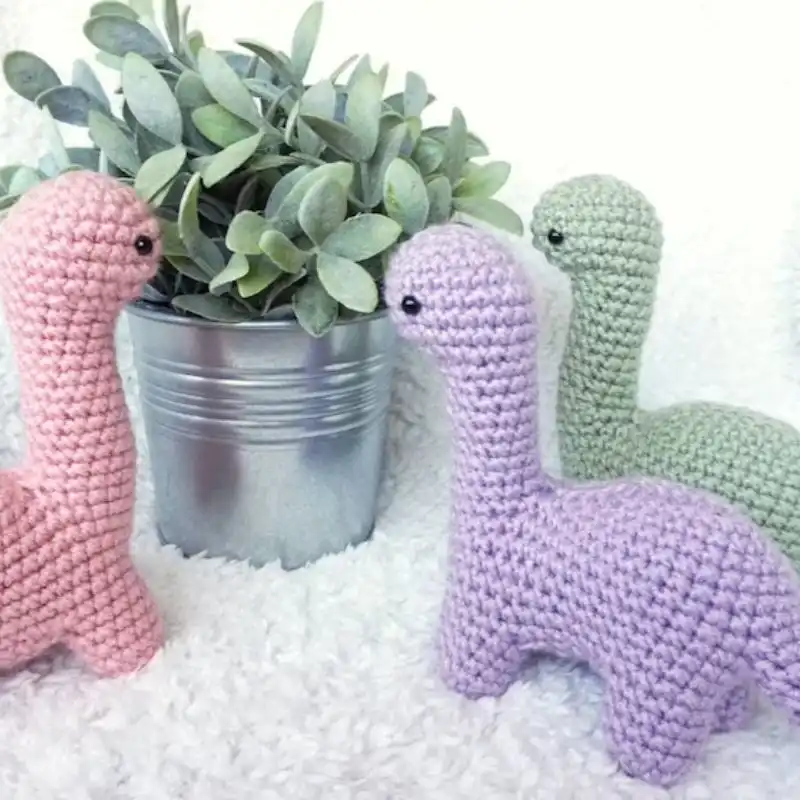
Suggested Yarn: Cotton Yarn
Difficulty Level: Intermediate
Yarn Weight: Worsted
Crochet Hook Size: 4.0 mm
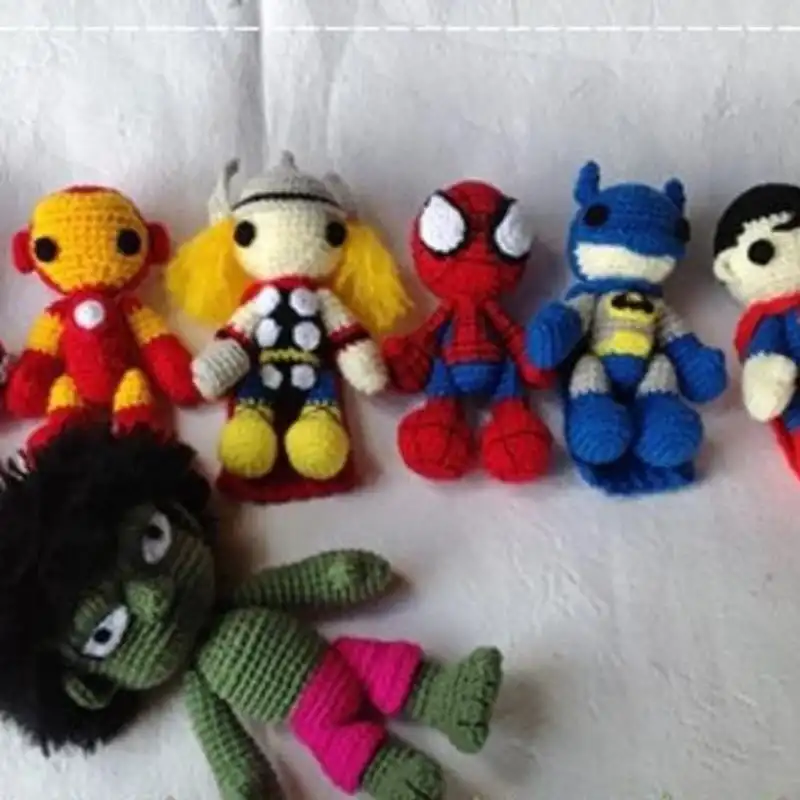
2. Superhero Set
This amazing Crochet seller on Etsy has created two amazing sets of superhero crochet patterns. With these patterns, you can make adorable merchandise of your favorite Marvel or DC superheroes, such as Spiderman, Batman, and Wolverine!
These tiny little figures are a perfect gift to make for your superhero-loving friends, or even for yourself, to show off your love for these characters.
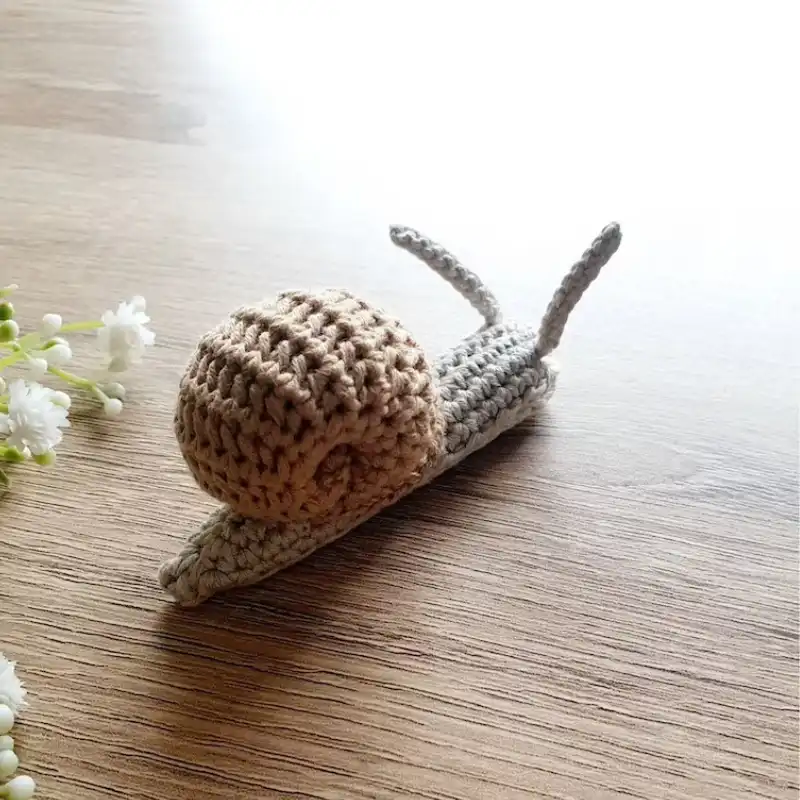
3. Snail Charm
Another perfect beginner’s pattern is this small snail. Affectionately called ‘Edward the Snail’ by the creator ‘CritterStitchDesigns’, this cute little guy would make for a perfect little decoration to make a house really feel like a home.
This pattern is perfect for those who want to create a natural look within their room, by including a little bit of natural life made entirely by hand!
4. Crochet Corgi
A dog fit for royalty! This tiny corgi on little legs has shiny black eyes that you just cannot resist. Make one of these little guys and place it somewhere in your home for a small pick-me-up that is bound to brighten up your day.
And you can be proud that you made it yourself! A small red/blue scarf around the dog’s neck, which stands out against his light tan body.
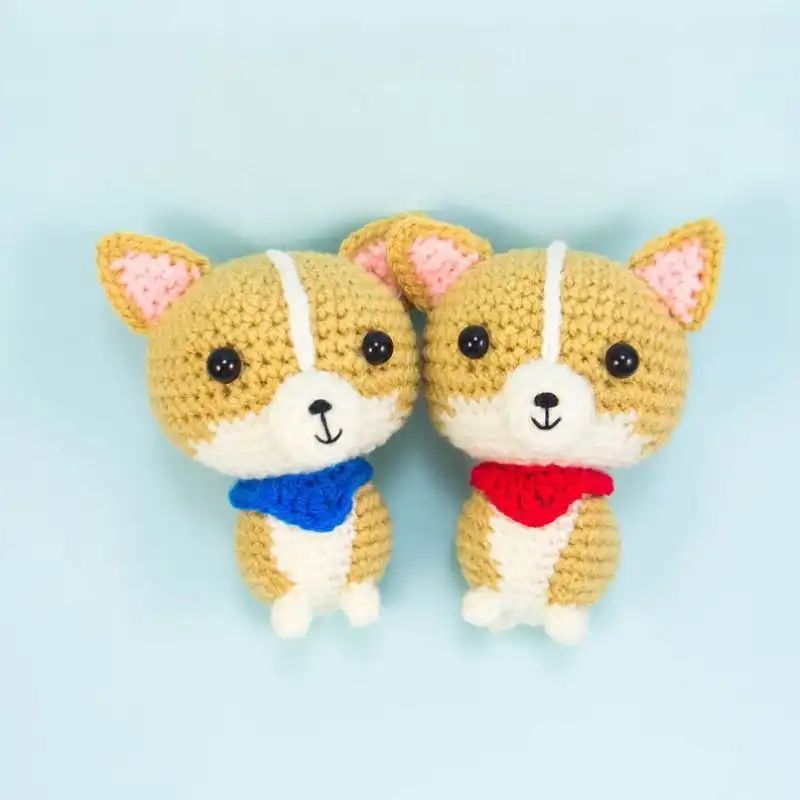
Suggested Yarn: Wool Blend Yarn
Difficulty Level: Intermediate
Yarn Weight: Worsted
Crochet Hook Size: 4.5 mm
5. Pig With Piglets
You can create an entire piggy family with this cute pattern. The pattern features a large mama pig figurine, with adorable details, such as the curled tail, the slight smile, and the large snout.
These figures look amazing together and add a cute spark to any room, and they also make a great gift, especially for any pig enthusiasts out there!
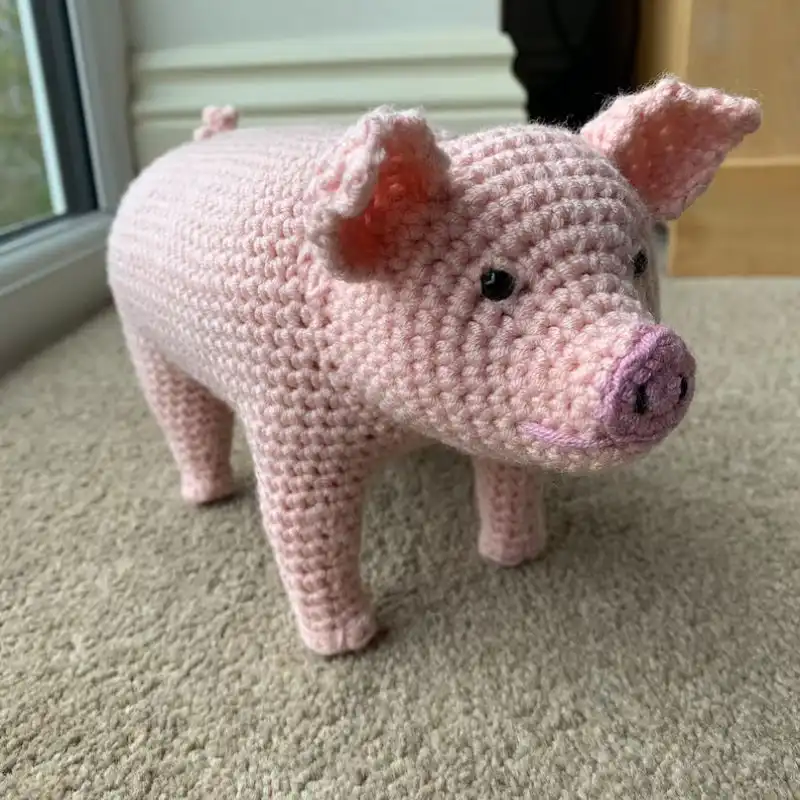
Suggested Yarn: Polyester Yarn
Difficulty Level: Intermediate
Yarn Weight: Aran
Crochet Hook Size: 5.0 mm
6. Charlotte The Unicorn
Drift away into fantasy dreams with Charlotte the Unicorn. This adorable little doll has a sleepy appearance that helps to foster an air of relaxation within any space. The small sleepy eyes help to ease your mind’s worries, and the subtle pastel colors help to further guide you into a happy dreamland.
This would also make for a perfect gift for a new parent, or to a young child, as it would make for a great soft toy or a great decoration for a child’s room.
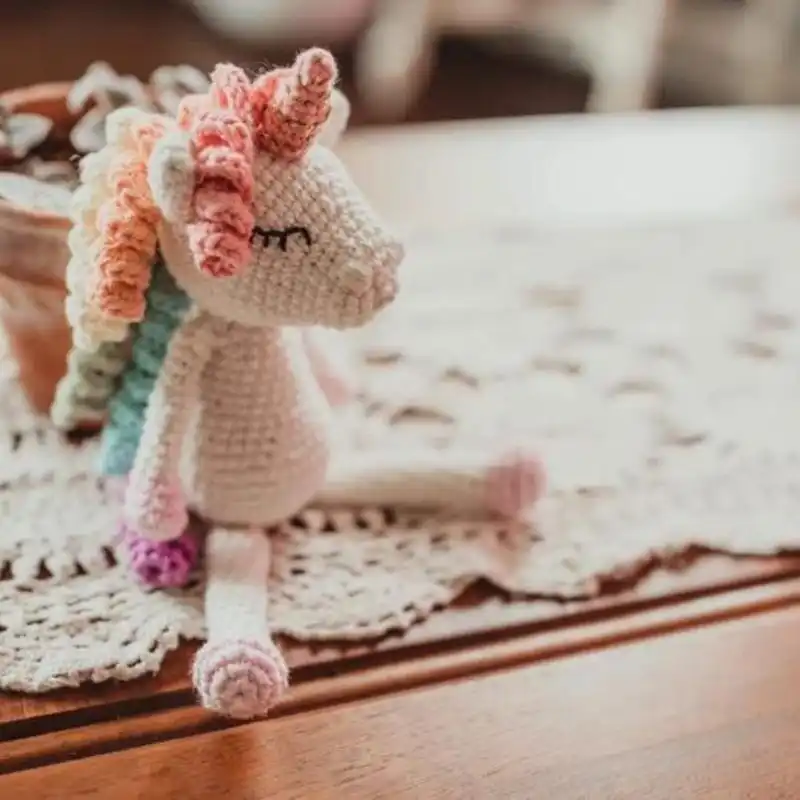
Difficulty Level: Advanced
Yarn Weight: Fingering
Crochet Hook Size: 2.75 mm
7. Gingerbread Train Engine
It’s not Christmas time without gingerbread! Gingerbread is a staple food of the holidays and is filled with warm and wonderful spices that get the tastebuds tingling.
This pattern has multiple elements to build and fix together, to create a train to Winter Wonderland, complete with white frosting, gumdrops, and even a muffin cart, towards the back of the train.
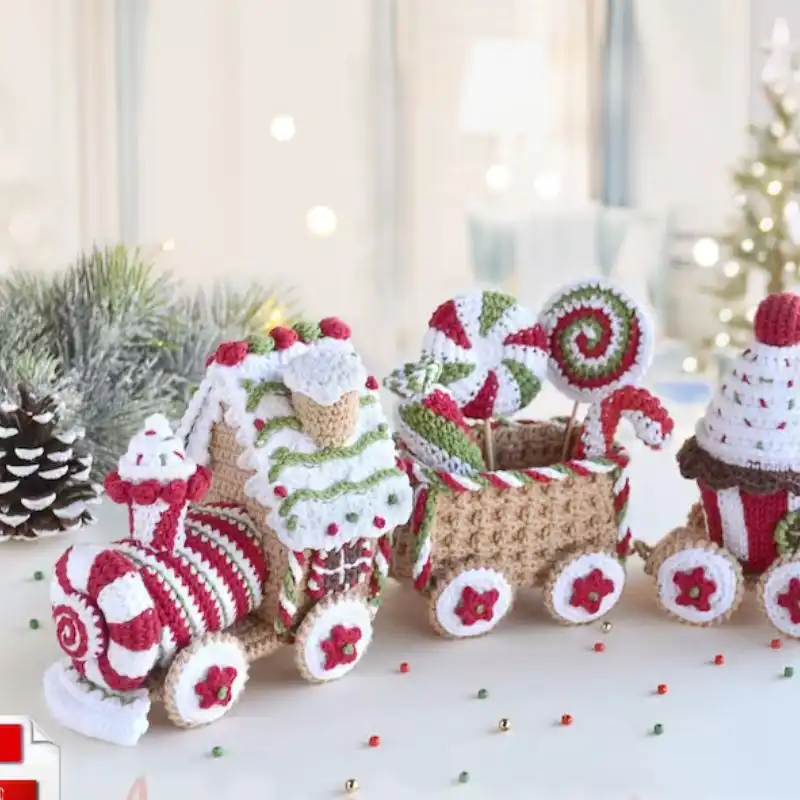
Suggested Yarn: DK weight yarn
Difficulty Level: Intermediate
Yarn Weight: Light
Crochet Hook Size: 4.0 mm
8. White Reindeer
Rudolph the red-nosed reindeer has some serious competition for the ‘cutest Christmas mascot’ now! Milo the Reindeer, the snow-white reindeer with intense black eyes is always ready to spread a little bit of festive cheer.
Small bells around his neck create a pleasant jingle, which makes him perfect as both a festive toy for a child or as just a Christmas decoration, to sit on the shelf.
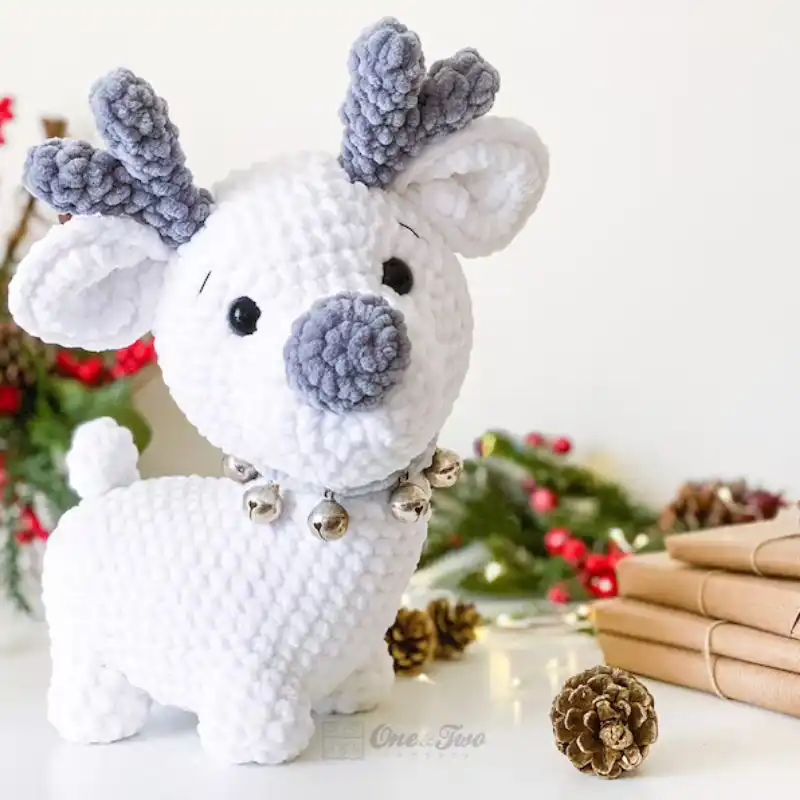
Suggested Yarn: Faux Fur Yarn
Difficulty Level: Intermediate
Yarn Weight: Super Bulky
Crochet Hook Size: 6.5 mm
9. Tiny Turtle
This adorable little turtle looks like he could take a satisfying nap just about anywhere! This simple and easy pattern is great for a beginner who wants to learn the ropes of Amigurumi and be able to create a perfect gift or a keepsake.
The subtle colors of the turtle aid in creating a relaxing look that is only complimented by his soft feel, and adorable sleeping face.
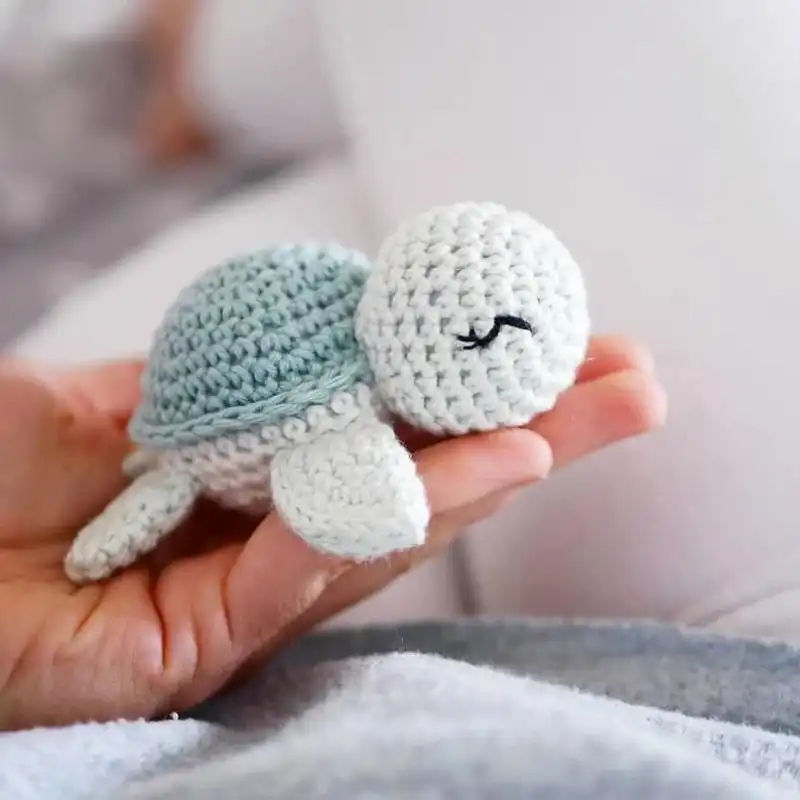
Suggested Yarn: Cotton Yarn
Difficulty Level: Beginner
Yarn Weight: DK (Light Worsted)
Crochet Hook Size: 3.5 mm
10. Bruce The Friendly Dinosaur
Want to try making an Amigurumi character that’s a little larger than usual? Introducing Bruce the Friendly Dinosaur! This large cutey would appear like Godzilla to some of your smaller Amigurumi projects, and would really make a collection stand out.
Bruce may appear large, but true to his name, he is extremely friendly, making him perfect for young children!
Suggested Yarn: Soft Acrylic Yarn
Difficulty Level: Intermediate
Yarn Weight: Worsted
Crochet Hook Size: 4.0 mm
11. Dolores The Giraffe
This pattern is slightly more complex than others we have explored so far, thanks to the multiple distinct parts that go into creating such a huggable soft friend.
Dolores features a warm yellow color, completed by brown spots across his body, and small brown feet that make him look adorable whether sat down on a shelf or while being played with.
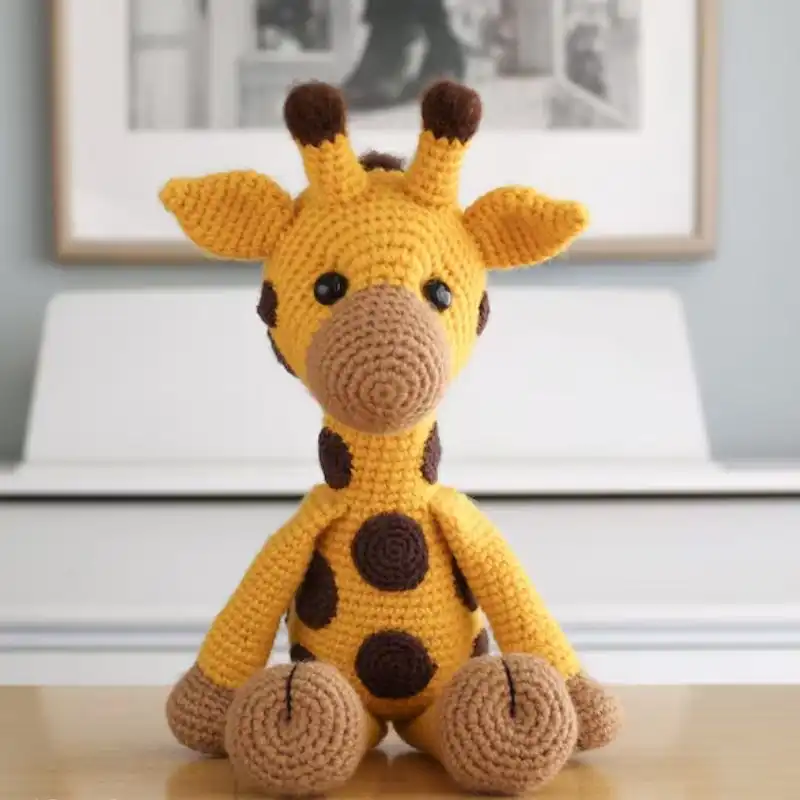
Suggested Yarn: Self Striping Yarn
Difficulty Level: Advanced
Yarn Weight: Aran
Crochet Hook Size: 5.0 mm
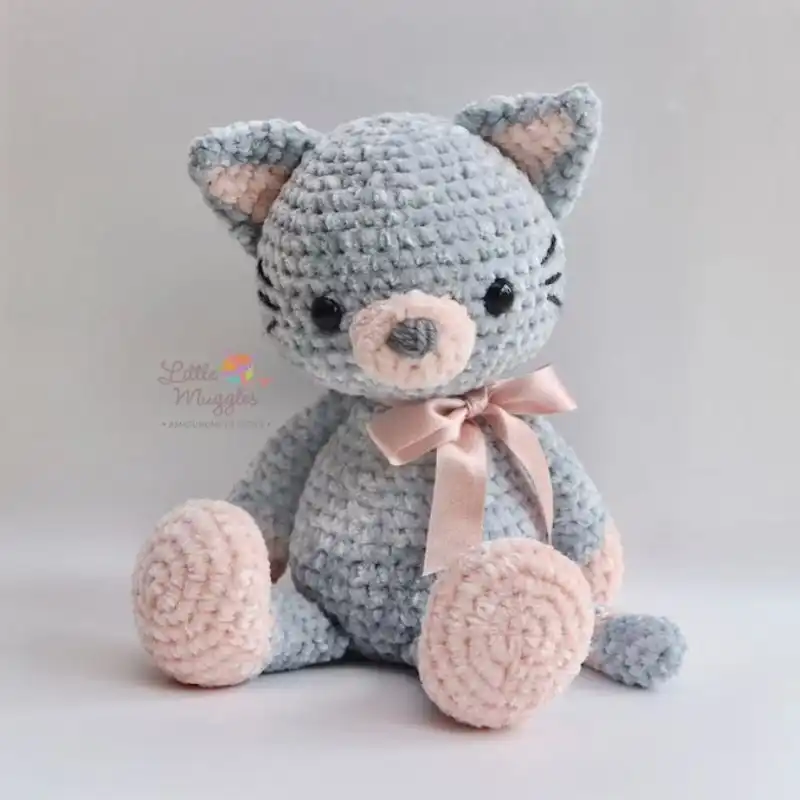
12. Cookie Kitty Crochet Pattern
You can use this pattern to create a whole bundle of the sweetest little kitty pals. These little kitties take on a classic doll shape, with exaggerated large heads, and small dangling legs, which helps to make them look tiny and cute. You could imagine one of these kitties resting comfortably in the palm of your hand!
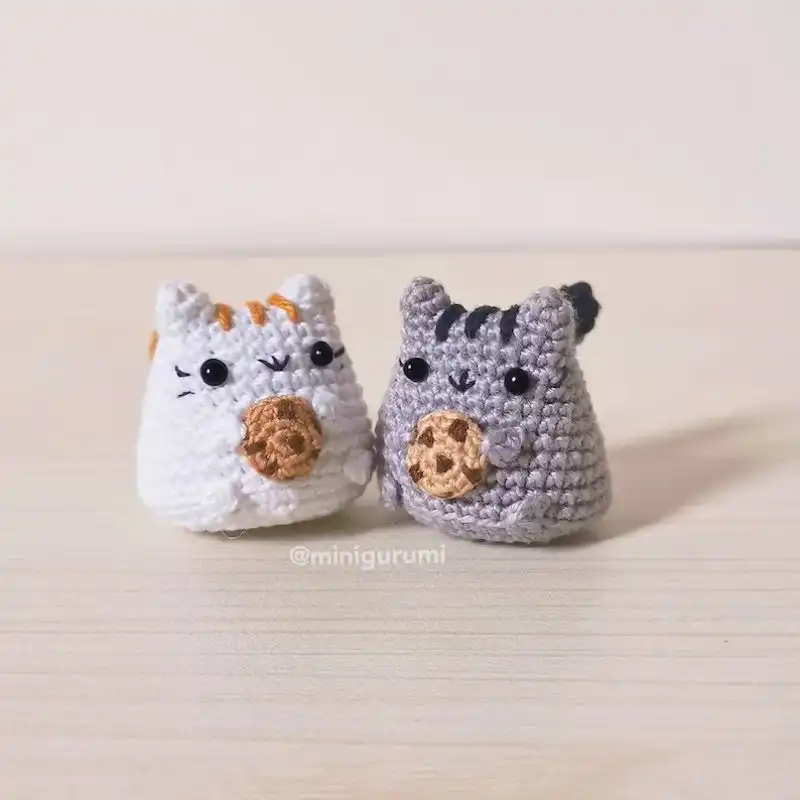
Suggested Yarn: Brown Acrylic Yarn
Difficulty Level: Intermediate
Yarn Weight: Worsted
Crochet Hook Size: 4.5 mm
13. Luna The Kitty
A pink bow tie across the neck of Luna the Kitty really goes a long way towards making this little kitty the cutest little thing out there. You can use all kinds of fabric to create this figure, but going by the image on the listing, it is best to find the softest material you can, to make Luna easily huggable.
Suggested Yarn: Bernat Pipsqueak Yarn
Difficulty Level: Beginner
Yarn Weight: DK (Light Worsted)
Crochet Hook Size: 3.5 mm
14. Baby Penguin Keychain
Want to create a small keychain to help you keep track of all of your important keys? Its adorable shape makes it easily portable, and so that it won’t take up too much space within your pockets, while still keeping your keys safe.
Create your penguin in a range of colors, to create your own perfect penguin, and even variate the face, by using beads for eyes, or stitching on closed eyes.
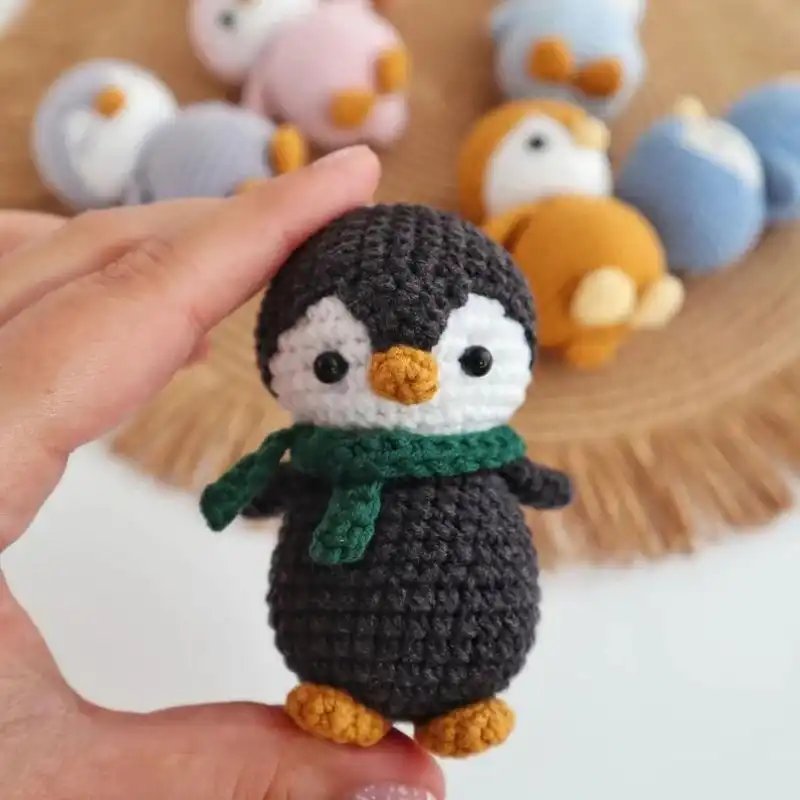
Suggested Yarn: Mercerized Cotton Yarn
Difficulty Level: Intermediate
Yarn Weight: Fingering
Crochet Hook Size: 2.75 mm
15. Snoopy And Woodstock
Everyone loves Snoopy. That’s an immutable fact of life. The character has immense staying power and is incredibly popular across the globe. You can celebrate your love for the character and his friend Woodstock thanks to this amazing crochet pattern. Snoopy sports his familiar smiling face and a soft and plush white body.
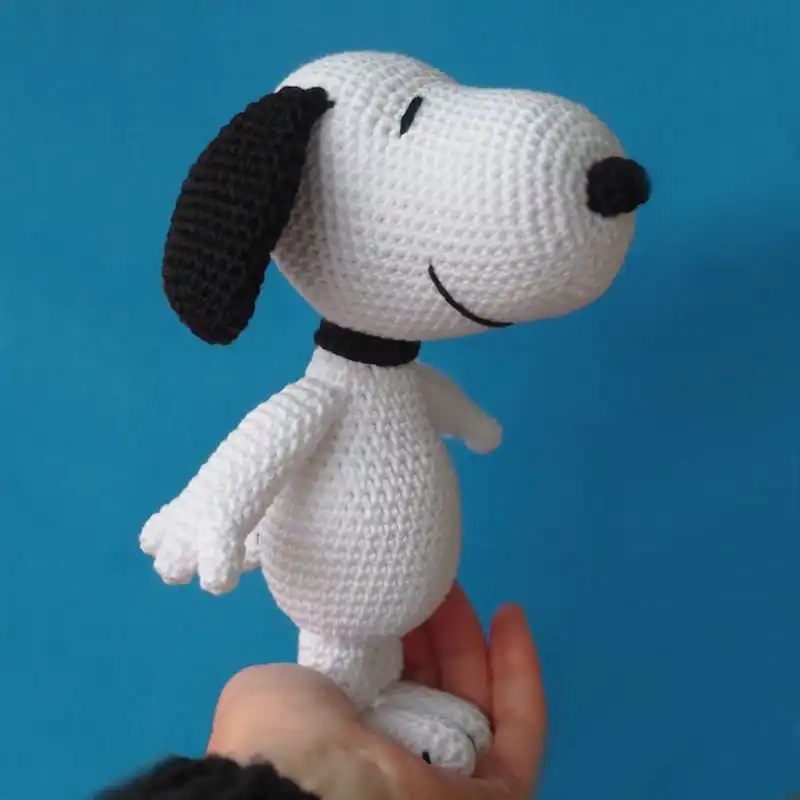
Suggested Yarn: Acrylic Yarn
Difficulty Level: Intermediate
Yarn Weight: Worsted
Crochet Hook Size: 4.0 mm
16. Pinocchio
Pinnochio’s wooden puppet frame is amazingly rendered in soft crochet, thanks to this pattern. Pinnochio’s wooden arms are created by creating flat arms pieces, and connecting them with adorable buttons.
Pinocchio’s yellow hat and shirt are complemented by flashes of red and blue. His red overalls create a whimsical look, while the large blue bow helps to emphasize his small and cute frame.
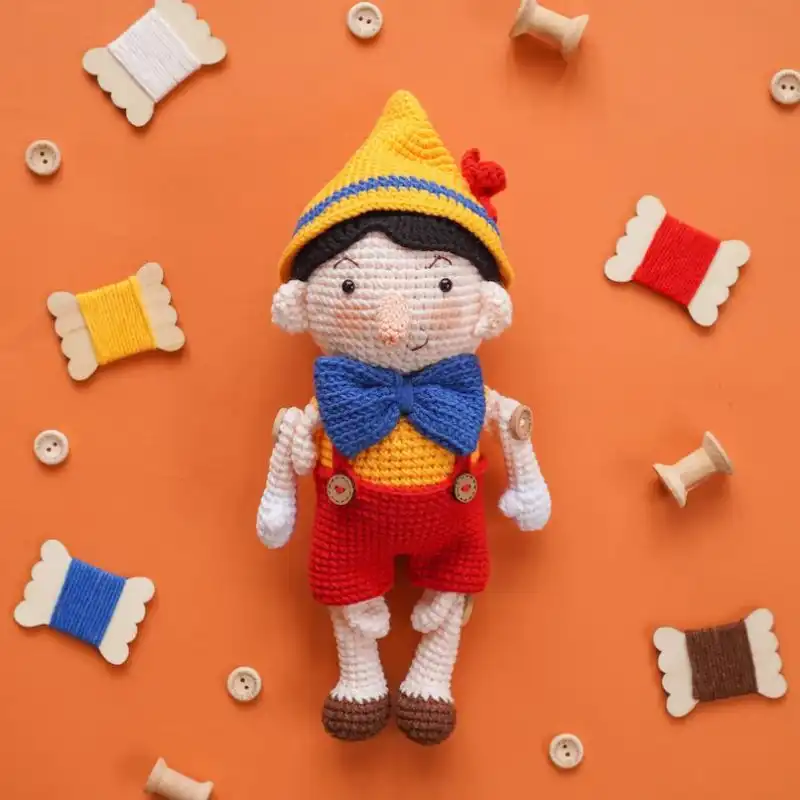
Suggested Yarn: Metallic Yarn
Difficulty Level: Advanced
Yarn Weight: Sport
Crochet Hook Size: 3.75 mm
17. Adorable Goose
This is one goose that’s ready for an adventure! The small eyes of the goose placed deep into his face give him an innocent look that makes him simply irresistible. Luckily, unlike a real goose, this one is great for hugging, thanks to the soft materials used to create him.
He’ll also look perfect on a shelf, as a decoration, and would make a wonderful gift for adventurous friends and family!
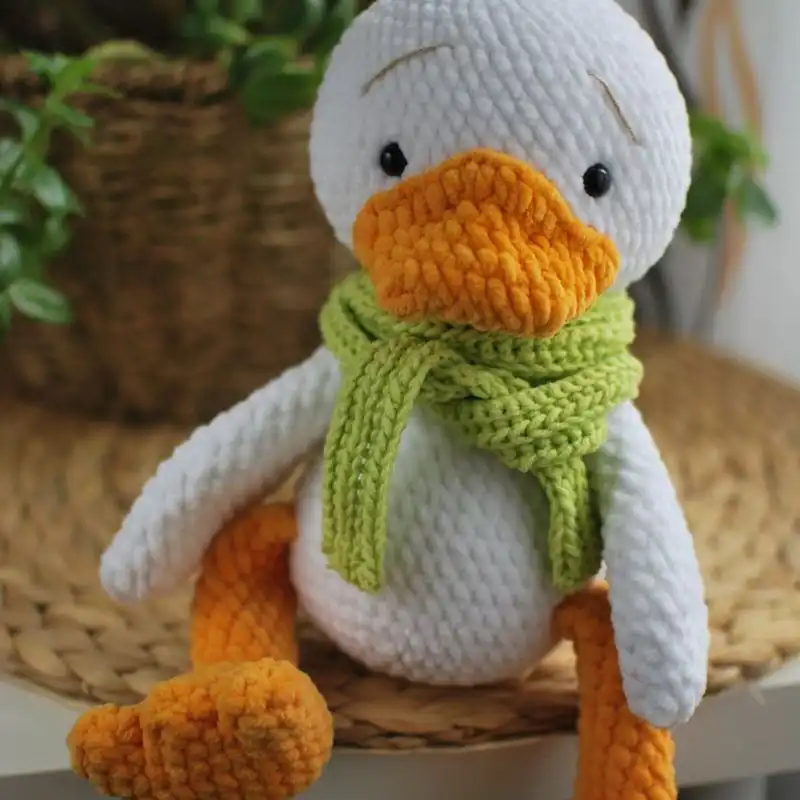
Suggested Yarn: Faux Fur Yarn
Difficulty Level: Intermediate
Yarn Weight: Bulky
Crochet Hook Size: 6.0 mm
18. Solar System Mobile
Know of any little future astronauts? They can be whisked to a peaceful land of sleep thanks to this creative little solar system mobile, which features all of the major planets in our system.
Each planet is lovingly rendered, such as Saturn, with its white rings, and the Sun, with its large rays shooting out in every direction.
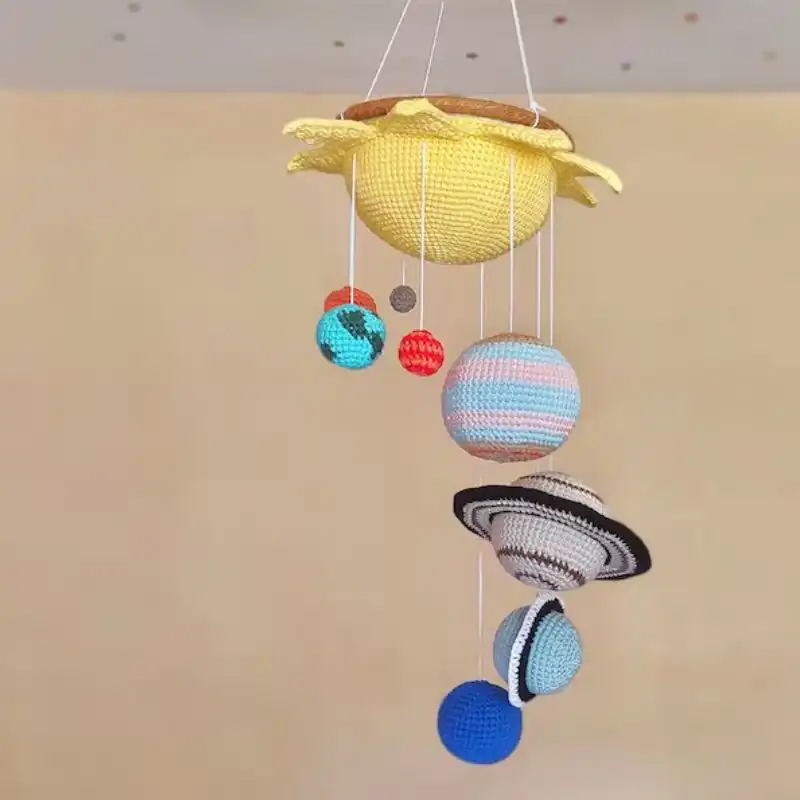
Suggested Yarn: Gradient Yarn
Difficulty Level: Advanced
Yarn Weight: Fingering
Crochet Hook Size: 2.75 mm
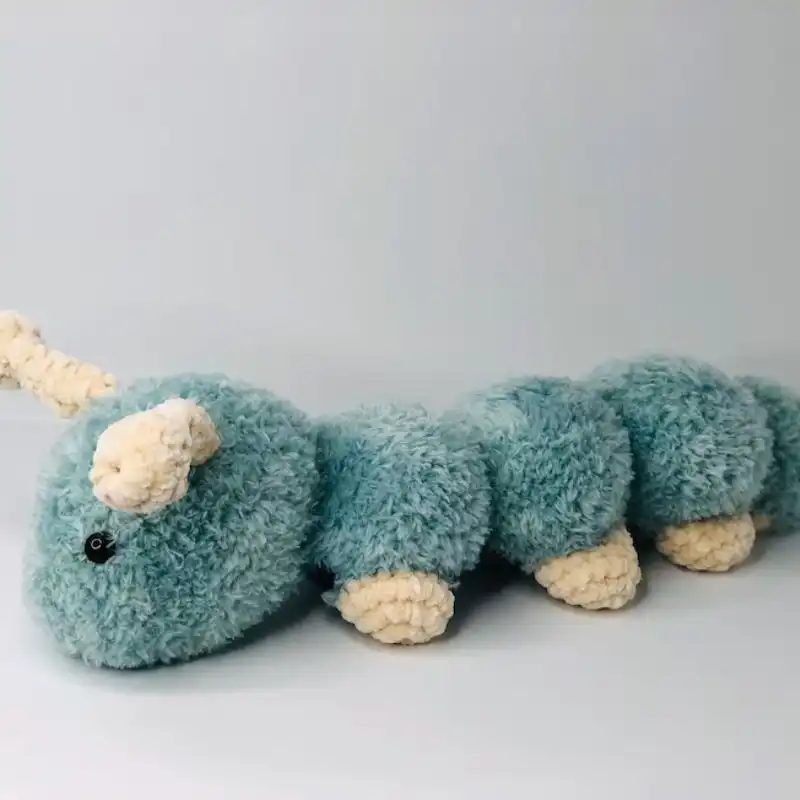
19. Caterpillar
Built for hugs, this wriggling little caterpillar makes for a perfect plush friend for any young child. With a body made up of small pompom shapes, this figure is easy to pose in a number of ways, so that you can display it on a shelf, or allow a child’s imagination to go wild!
The large green-blue face of this caterpillar has an adorable appearance, with an understanding expression, exaggerated by its large black eyes.
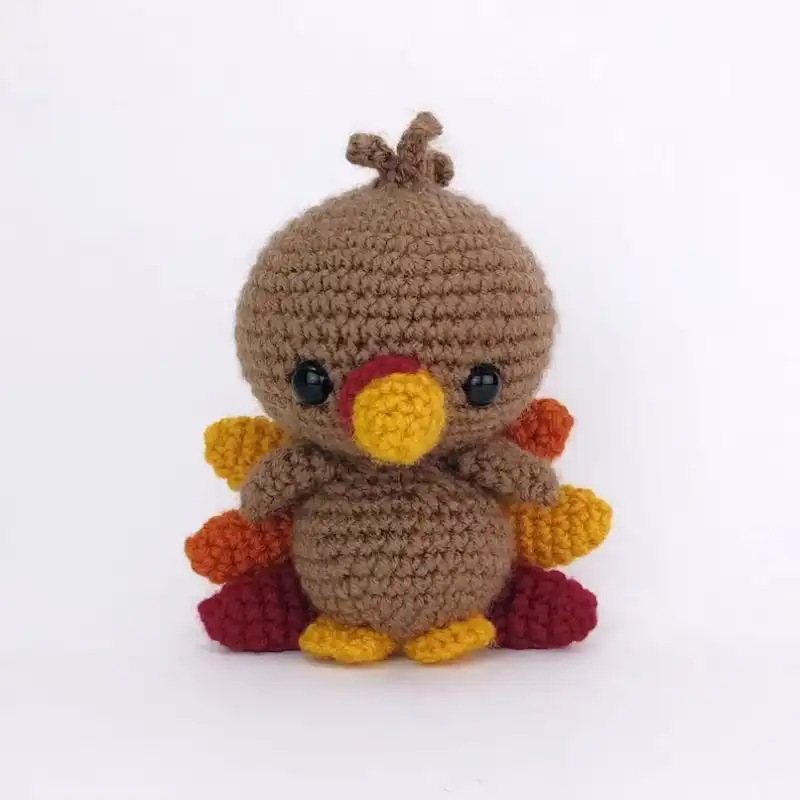
20. Terrence The Turkey
Terrence the Turkey is simultaneously incredibly easy and incredibly fun to create. Terrence makes for a great Thanksgiving decoration to spruce up your home during the holidays, and also makes for an amazing gift to say thanks to those you love.
The autumnal colors used to create Terrence further emphasize that comfortable autumnal look that makes him an absolute pleasure to have around.
21. Baby Axolotl
This perfect pattern allows you to create an axolotl of your own so that you’ll always have something worth smiling about.
This pattern is best recommended for those with experience, as it requires some measure of skill to achieve the perfect result. However, it doesn’t use a massive number of materials and features a small set of colors, which gives it a deceptively simple look.
Suggested Yarn: Acrylic Yarn
Difficulty Level: Intermediate
Yarn Weight: DK (Light Worsted)
Crochet Hook Size: 3.5 mm
22. Stitch
If you want to add a bit of Stitch to your home, then follow this simple pattern, and you’ll soon have your own baby-sized Stitch that will have you saying “Aww” every time you see it.
This also makes for a great gift for any Disney nuts that you know who simply adore the character, and has a personal handmade flair that other Stitch merchandise could never achieve!
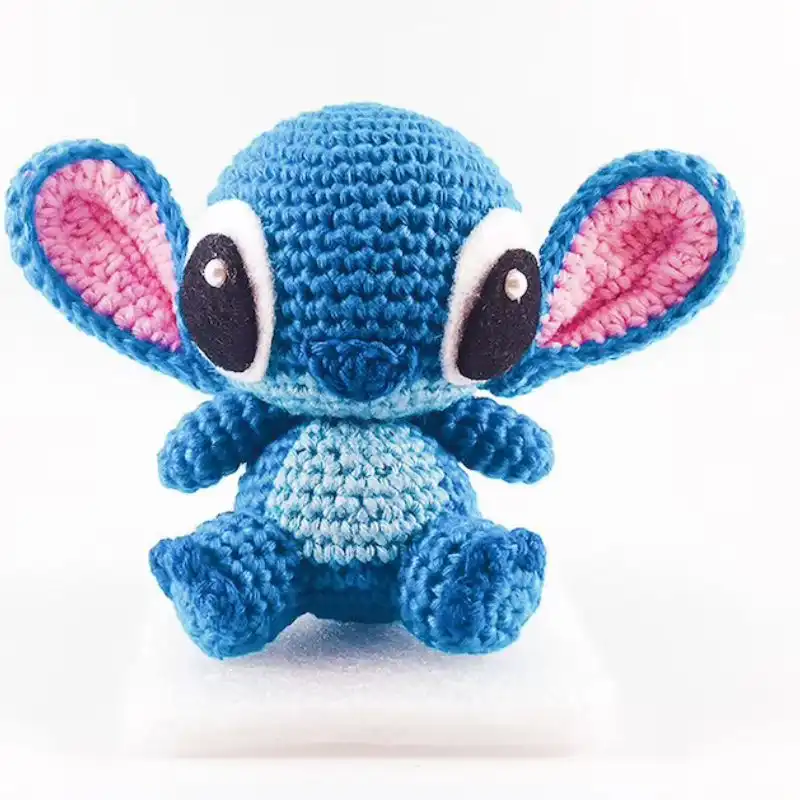
Suggested Yarn: Metallic Yarn
Difficulty Level: Advanced
Yarn Weight: Fingering
Crochet Hook Size: 2.75 mm
23. The Grinch
Spread a little Christmas cheer with this mini Grinch ornament. While the Grinch might famously despise the well-loved holiday, he has become a symbolic character. It can be hard for some to imagine Christmas without thinking of the green monster.
This small crochet pattern will help you to create a little Grinch of your own that would look perfect hanging from your favorite Christmas tree.
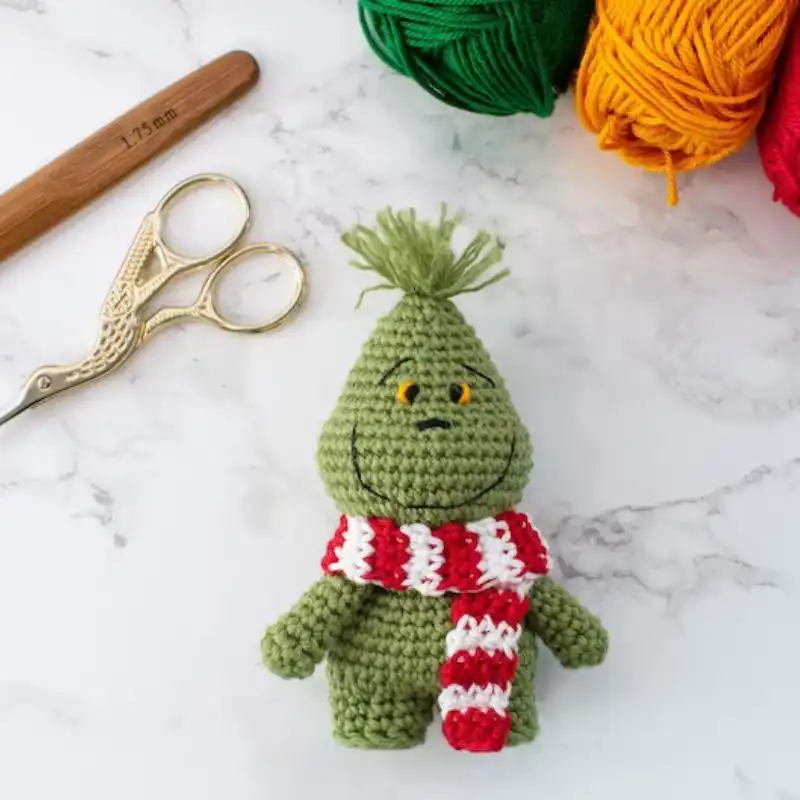
Suggested Yarn: Green Fur Yarn
Difficulty Level: Intermediate
Yarn Weight: Bulky
Crochet Hook Size: 6.0 mm
24. Silver Tabby Cat
The incredibly popular ‘Hainchan’ has created these stocky little tabby cat dolls that you can now create for yourself.
Each kitty comes with its own small fish-shaped knapsack, which fits with the feline theme. You could picture this cat going on a fishing expedition with friends and coming back with its knapsack full of great catches!
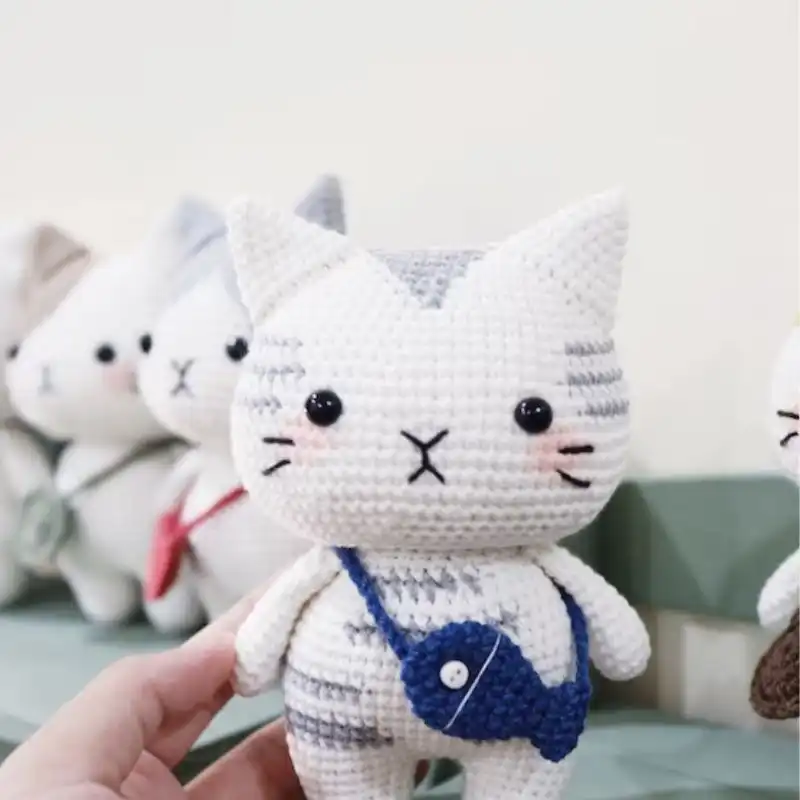
Suggested Yarn: Tabby Fur Yarn
Difficulty Level: Intermediate
Yarn Weight: Worsted
Crochet Hook Size: 4.5 mm
25. Tiny Shark
Be careful that you don’t end up with a specific viral song stuck in your head while you create these tiny sharks.
Who’d have thought that sharks could make for such cute amigurumi dolls? These round little sharks have a simplicity to them that makes them incredibly adorable, with little fins and large black and beady eyes.
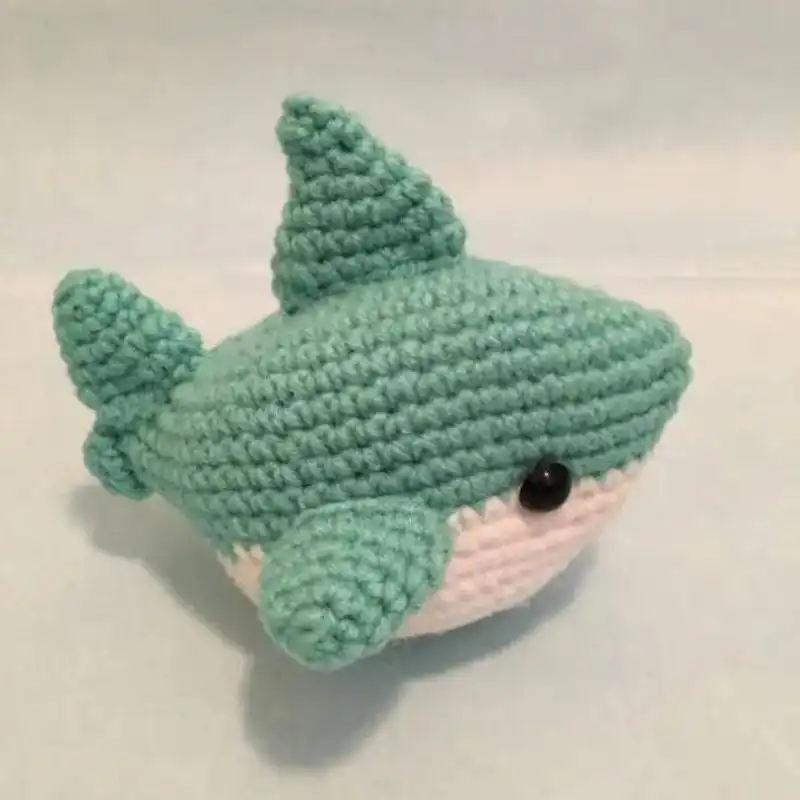
Suggested Yarn: Gradient Yarn
Difficulty Level: Intermediate
Yarn Weight: Worsted
Crochet Hook Size: 4.0 mm
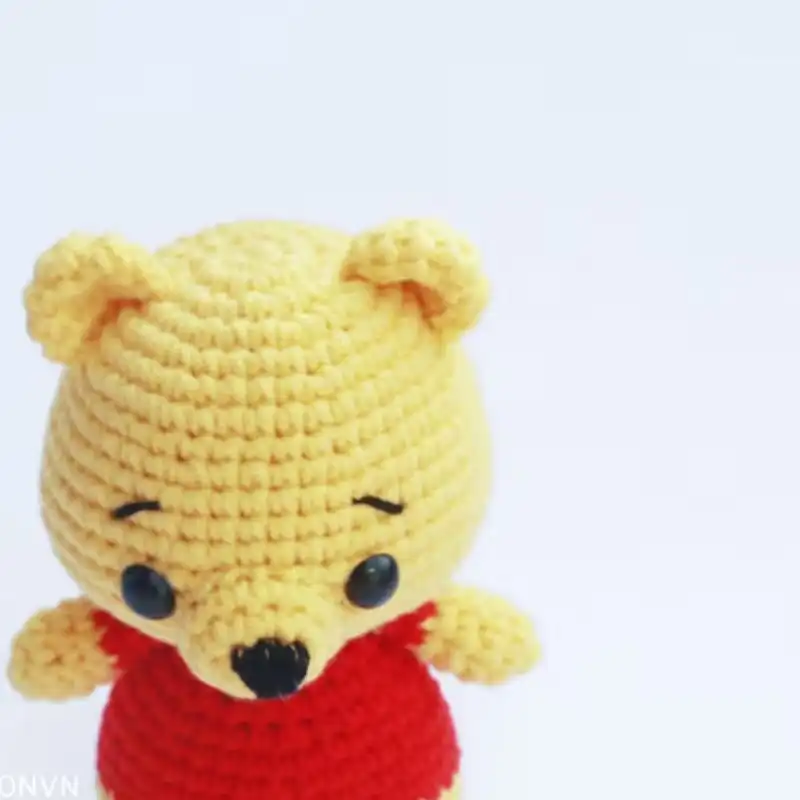
26. Pooh Bear
Stock up on honey, because here comes Winnie the Pooh! This adorable and simple crochet pattern allows you to create a little Pooh bear.
The doll has a large head with beady eyes and a cute button nose, and the body of the doll has a plumpness that is perfect for the honey-guzzling stuffed bear.
The pattern is put together expertly and tells you everything you need to know to create your own pocket-sized version of everyone’s favorite bear.
27. Yoshi
Everyone’s favorite green dinosaur mascot is here! Yoshi, the companion of the ever-popular Super Mario, looks ready for a good hug thanks to this simple pattern. Each recognizable element of Yoshi’s design is easy to create and comes together to create the character that we all know and love.
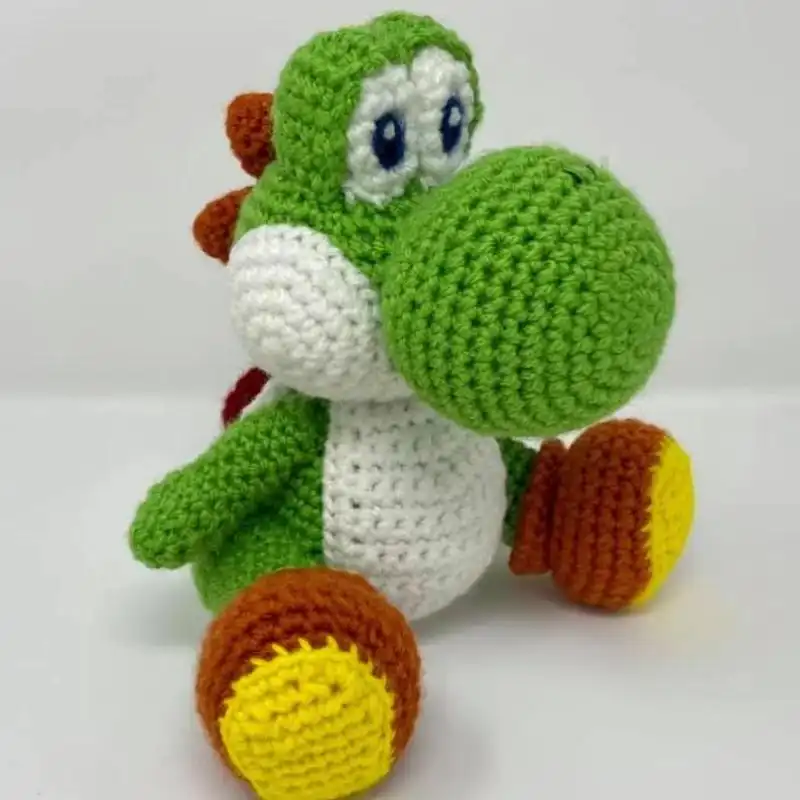
Suggested Yarn: Dinosaur Green Yarn
Difficulty Level: Advanced
Yarn Weight: Fingering
Crochet Hook Size: 2.75 mm
28. Lion
The incredible attention to detail in this crochet pattern makes it truly worth trying out. The lion’s mane made up of hundreds of brown strings really helps to make this little doll pop, and gives it a ferocity that is complemented by its cute appearance.
Unlike a real-life lion, this friendly fella might be a bit more receptive to a good hug, and its plush filling makes it absolutely perfect for that purpose!
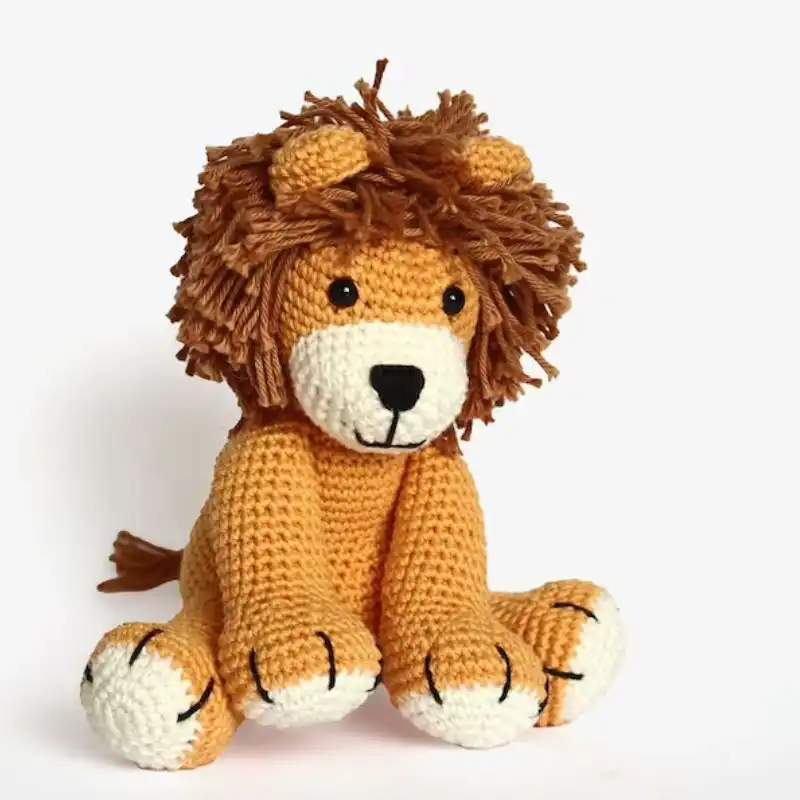
Suggested Yarn: Savannah Brown Yarn
Difficulty Level: Intermediate
Yarn Weight: Worsted
Crochet Hook Size: 4.5 mm
29. Mouse
I’ll bet you’ve never seen a mouse as cute as this! With droopy ears that hang down from the back of his head and small black eyes, he has a certain innocence to him that might have you struggling to resist giving him a strong cuddle.
When making this plush toy, we recommend using pastel colors, to create a soft look that will make him feel softer than he already is!
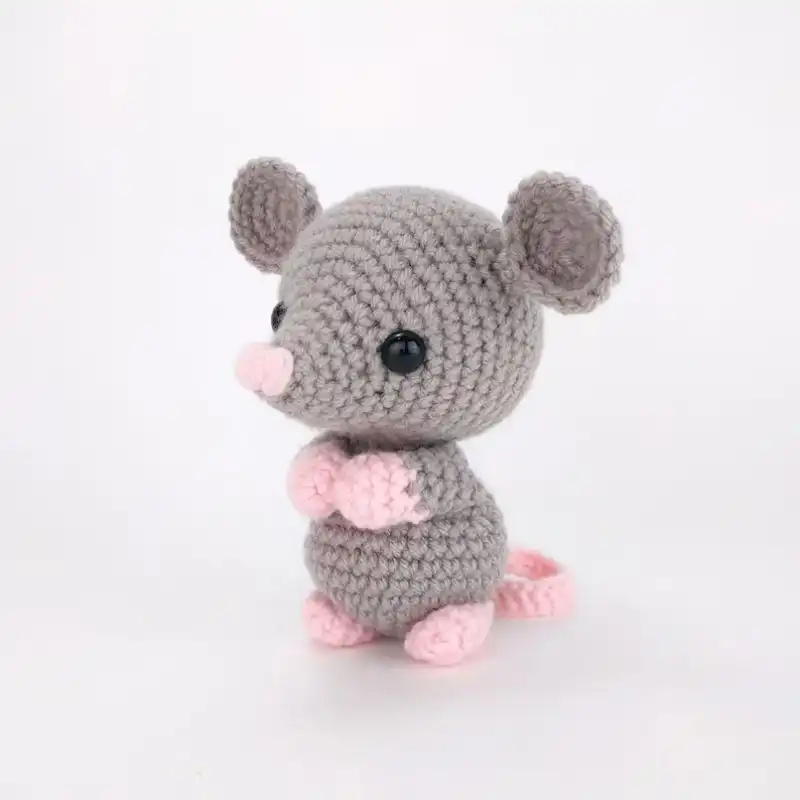
Suggested Yarn: Gray Mouse Fur Yarn
Difficulty Level: Beginner
Yarn Weight: DK (Light Worsted)
Crochet Hook Size: 3.5 mm
30. Charizard
Charizard is amongst one of the most recognizable of all 900 currently-existing Pokemon! Having been there from the very start as one of the starting pokemon, it’s no surprise that fans all over the World will buy anything with his appearance on it.
Luckily, unlike an extremely rare shiny Charizard Pokemon card, this Charizard crochet pattern is very affordable, and allows you to display your love for the orange dragon in all of his blazing orange glory!
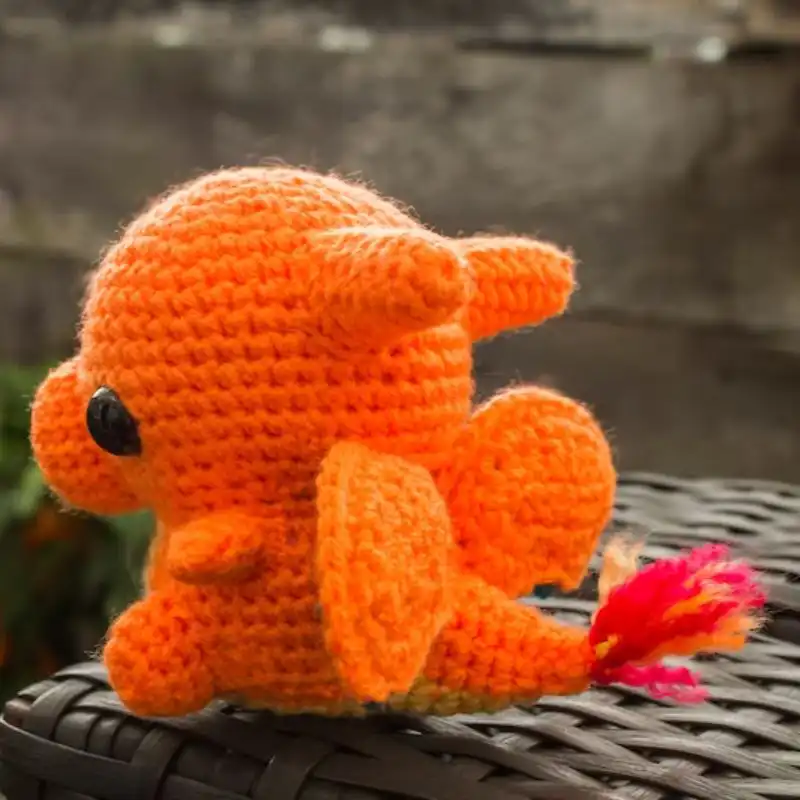
Suggested Yarn: Fire-Red Yarn
Difficulty Level: Advanced
Yarn Weight: Worsted
Crochet Hook Size: 5.0 mm
31. Ice Cream Narwhal
What could be better than a normal Narwhal? An ice cream Narwhal! With a rainbow patterned horn, made to look like a cone, and a splash of melted ice cream atop his head, this adorable little design is proving to be very popular amongst Etsy customers, who are buying up the pattern in droves.
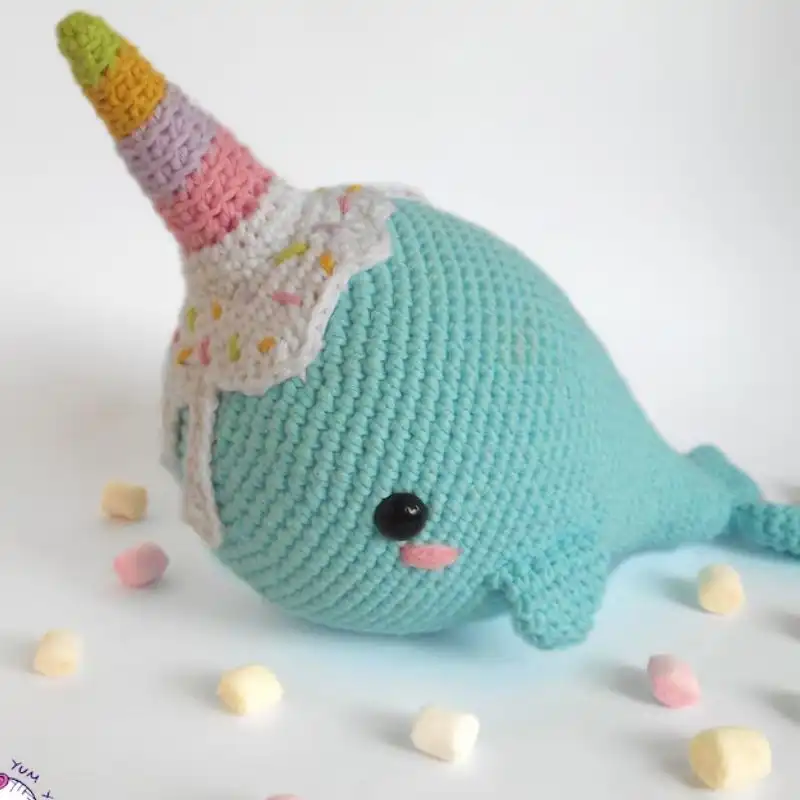
Suggested Yarn: Sweet Treat Yarn
Difficulty Level: Intermediate
Yarn Weight: Aran
Crochet Hook Size: 5.0 mm
32. Playful Cats
These mischievous little scamps are full of energy, and will easily light up any room you place them in. Even better, give one as a gift to a close friend and watch as a smile spreads across their face!
This pattern is simple and easy to follow, and you can make as many as your heart desires, in different colors or patterns, to create a whole family of little playful cats.
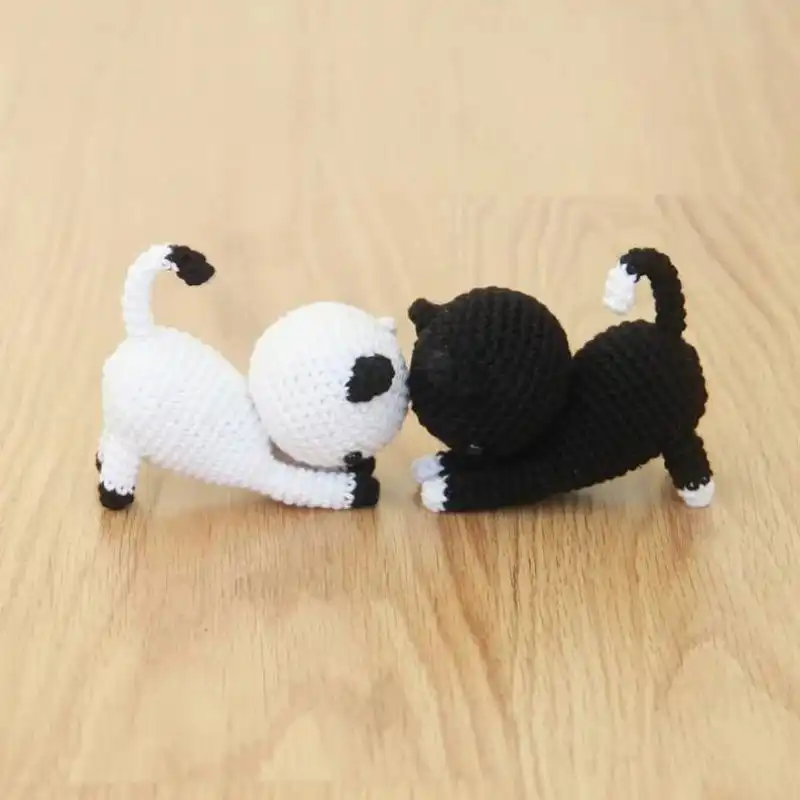
Suggested Yarn: Multicolored Yarn
Difficulty Level: Intermediate
Yarn Weight: Worsted
Crochet Hook Size: 4.0 mm
33. Otter Friends
These crochet buddies are ‘otterly’ adorable! With little stubby feet and large heads, you could easily picture these little guys drifting peacefully down the river, with their bellies up!
You can also place little trinkets in between their little feet, to personalize it to your tastes, or to make it extra special as a gift to a loved one.
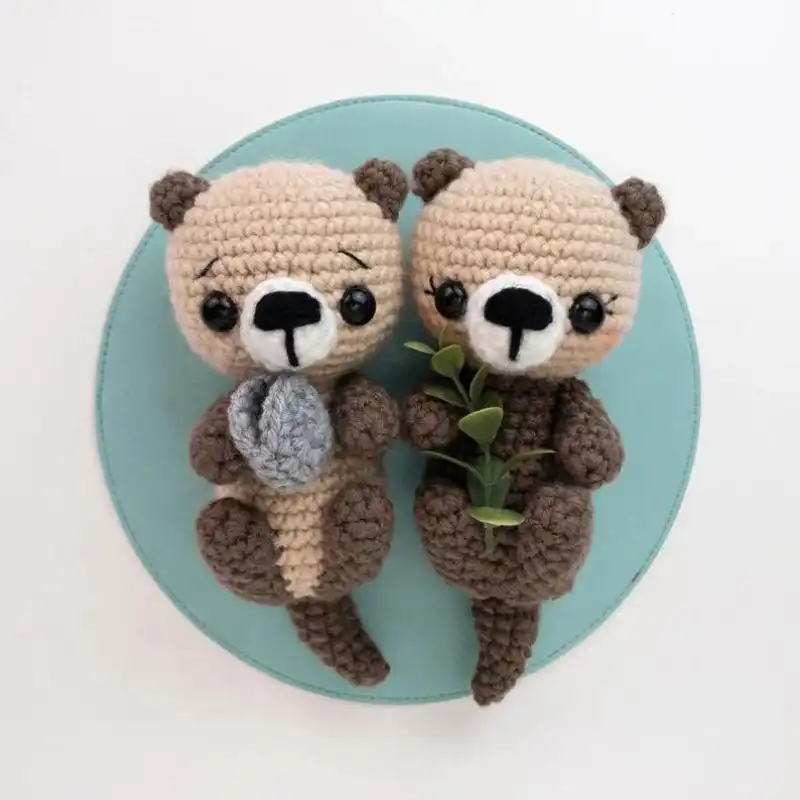
Suggested Yarn: Soft Brown Yarn
Difficulty Level: Intermediate
Yarn Weight: DK (Light Worsted)
Crochet Hook Size: 3.75 mm
34. Monkey
‘Cheeky Monkey’ would be an appropriate term for this mischievous guy. This wacky and cartoonish monkey pattern is full of character and energy, which really makes it stand out amongst the competition.
Each foot and hand is incredibly detailed, with individual fingers and toes, so that you can put him into all manner of cooky poses! The long tail can also wrap around objects, so that any young children can easily play around with it, and imagine it swinging around between trees!
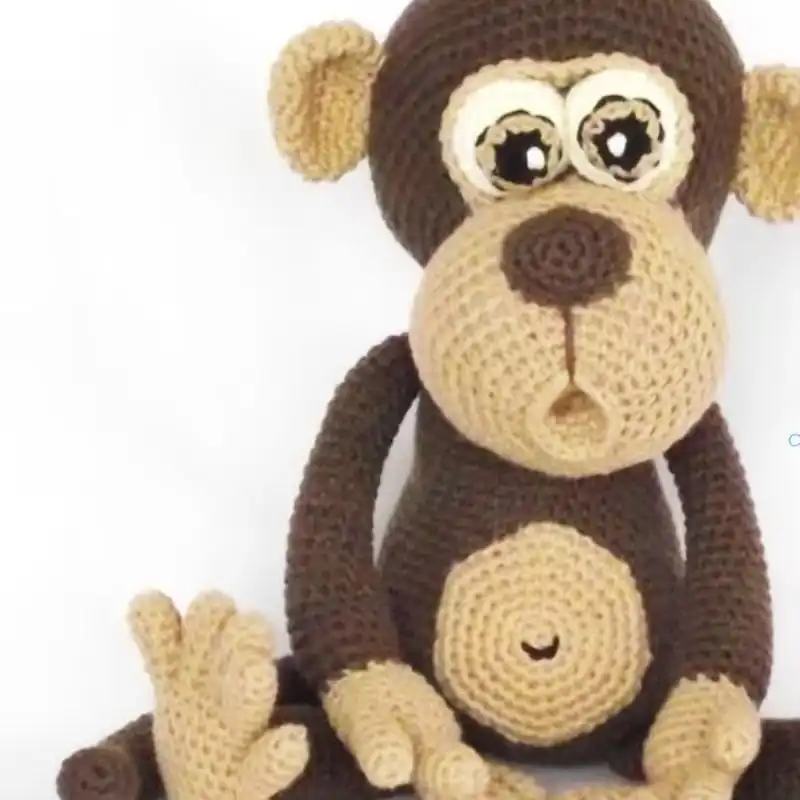
Suggested Yarn: Brown Monkey Fur Yarn
Difficulty Level: Intermediate
Yarn Weight: Worsted
Crochet Hook Size: 4.5 mm
35. Avocados In Love
You might have to control yourself while making this one. You’ll find yourself saying “Aww” throughout every second of production! This adorable pair fits together perfectly, around a shared heart piece, made to stand in place of an ordinary Avocado stone!
This would be perfect as a gift for any Avocado-lovers or foodies that you know, and it would also make for a great valentine, as something to give to that special someone.

Suggested Yarn: Green Avocado Yarn
Difficulty Level: Beginner
Yarn Weight: DK (Light Worsted)
Crochet Hook Size: 3.5 mm
36. Pink Frosted Donut
Now for a crochet pattern that even Homer Simpson couldn’t resist! This soft pink-glazed donut pattern almost looks good enough to eat! Though it may look intensely realistic, we’d recommend against eating it, unless you want a mouth full of fluff!
This donut pattern creates a wonderful decoration that would look right at home in a kitchen, or even on a coffee table, stacked upon other crochet donuts!
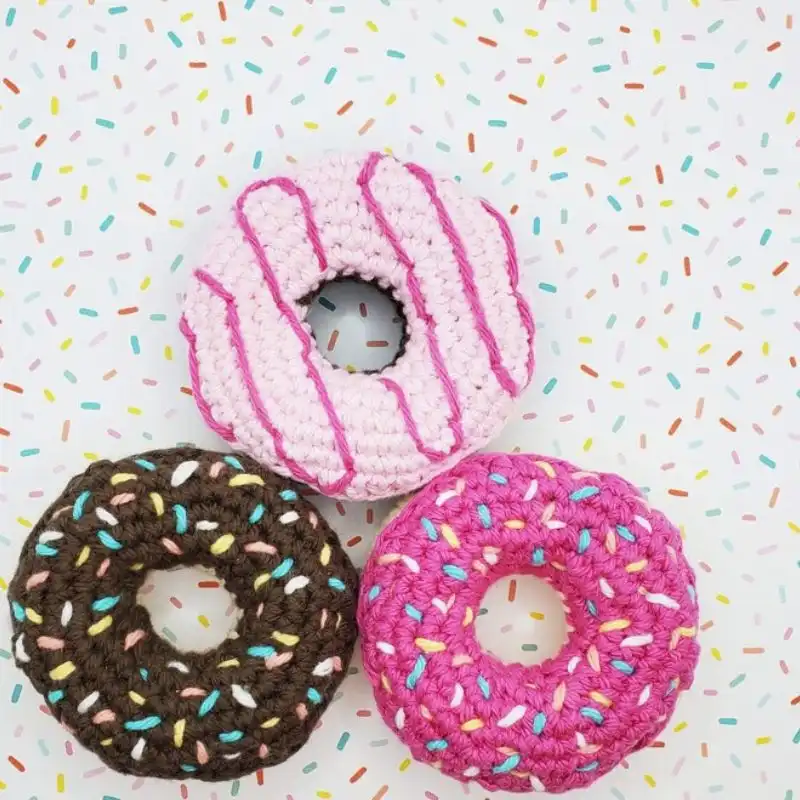
Suggested Yarn: Pink Frosted Yarn
Difficulty Level: Beginner
Yarn Weight: Worsted
Crochet Hook Size: 4.0 mm
Do’s & Don’ts For A Safe Amigurumi For Children
Creating amigurumi for children requires special attention to safety. Here are some do’s and don’ts to consider:
Do’s
- Use Safe Materials: Opt for yarn and stuffing that are non-toxic and hypoallergenic. Check for labels that specify the materials are child-safe.
- Tight Stitches: Use a smaller crochet hook to ensure the stitches are tight and close together so the stuffing doesn’t leak out.
- Secure Attachments: If your amigurumi has separate pieces (arms, legs, or ears), ensure they’re securely attached. Double or even triple-sew these parts for added security.
- Embroidered Features: Instead of using plastic eyes or buttons, consider embroidering facial features with yarn to eliminate small parts that could be choking hazards.
- Quality Stuffing: Use a high-quality, washable stuffing. Make sure it’s packed tightly enough to maintain the amigurumi’s shape but not so tight that it stretches out the stitches, making gaps.
- Wash Before Gifting: Always wash the amigurumi in mild, child-friendly detergent before giving it to a child, especially if you’ve been handling it a lot during the creation process.
- Test Durability: Gently pull on the limbs and features of the amigurumi to ensure they’re securely attached and can withstand some amount of pulling and tugging.
Don’ts
- Avoid Small Parts: Do not use small, detachable items like buttons, beads, or plastic eyes, as they can be a choking hazard for young children.
- No Loose Ends: Ensure all yarn ends are woven securely so they don’t come loose and pose a risk of tangling or choking.
- Avoid Wire Frames: Don’t use wire to shape limbs or other amigurumi parts, as broken or protruding wire can cause injury.
- Skip Fragile Decorations: Avoid sequins or delicate fabric that can be easily torn off, ingested, or choked on.
- No Long Strings or Ribbons: Avoid attaching long strings, ribbons, or anything that could be a strangulation hazard.
- Avoid Heavy Objects: Don’t incorporate heavy objects inside the amigurumi that could cause injury if the toy is thrown or falls.
- Avoid Sharp Objects: Ensure no sharp objects like needles or pins are left in the amigurumi. Always double-check!
Tips & Tricks To Avoid Crochet Mistakes
Creating Amigurumi can be a rewarding process, but it can also be complex and intricate, particularly for beginners. Here are some tips and tricks to avoid common crochet mistakes:
- Use Stitch Markers: Amigurumi is usually worked in a continuous spiral, so it can be difficult to tell where each round starts and ends. Using a stitch marker to indicate the beginning of the round can help you keep your place.
- Count Your Stitches: It’s easy to miss or add extra stitches, which can throw off your pattern. Counting your stitches at the end of each round can help you ensure you’re on track.
- Check Your Gauge: The stuffing might show through if your stitches are too loose. On the other hand, if they’re too tight, it can be difficult to insert your hook. Practice your stitches to find a tension that’s just right for Amigurumi.
- Learn the Invisible Decrease: The standard decrease can create a noticeable bump in Amigurumi. The invisible decrease is a technique that reduces this bump, making your work look more neat and polished.
- Stuff Correctly: Overstuffing can cause your Amigurumi to lose shape while understuffing can make it look deflated. Try to find a balance – it should be firm, but the stitches should be manageable.
- Use the Right Hook Size: If you’re using the recommended yarn weight for Amigurumi (worsted weight), a smaller hook size (3.5mm or 4mm) can create tight stitches that hold their shape well.
- Take Your Time: Rushing can lead to mistakes. Take your time, especially when assembling your Amigurumi. Check and double-check your alignment before you start sewing.
- Keep Practicing: Every project is a learning experience. Please don’t get discouraged by mistakes; they’re all part of the process. The more you practice, the more your skills will improve.
How To Block The Crochet Amigurumi Projects?
Blocking is a finishing technique used to set the final shape of a crochet or knit project. It’s usually done for projects like doilies, scarves, or sweaters that benefit from having a precise, uniform shape.
However, blocking isn’t typically used for Amigurumi. Because of their 3D nature and the fact that they’re stuffed, Amigurumi don’t usually require blocking to achieve the desired shape. Instead, the shaping is achieved through the stuffing and assembly process.
If you have a flat piece in your amigurumi project that needs blocking, here’s a simple process to do so:
Wet Blocking:
- Soak the piece in warm water until thoroughly wet.
- Gently squeeze out the excess water (without wringing), then lay it on a clean towel.
- Shape it to the desired dimensions, and pin it in place using rust-proof pins.
- Allow it to air dry completely.
Spray Blocking: If the piece doesn’t need a lot of reshaping, you can mist it with a spray bottle instead of soaking it. Lay it on a towel, shape and pin it, then let it dry.
Steam Blocking: This method uses the steam from an iron. Lay your piece on an ironing board or heat-resistant surface, shape it, and pin it down. Hold the steam iron a few inches above the work – don’t let it touch, as it can burn or melt the yarn – and apply steam evenly across the piece. Let it cool and dry in place.
RELATED: 50 Delicate And Beautiful Baby Blanket Crochet Patterns (With Pictures)
Suggestions To Add a Personal Touch
Adding a personal touch to your Amigurumi can make your creations unique and extra special. Here are some suggestions:
- Play with Colors: While following the color recommendations in a pattern is important, if you’re trying to create a specific character, you can always use your favorite colors or those of the person you’re making the Amigurumi for.
- Add Accessories: Hats, scarves, bows, or even tiny crochet flowers can add much character to your Amigurumi.
- Embroider Features: Instead of using plastic eyes or other accessories, embroider the facial features to give your Amigurumi a unique look. It also makes it safer for babies or young children.
- Experiment with Textures: Use different weights or types of yarns to add textural interest to your Amigurumi. Fuzzy yarn for hair or soft, velvety yarn for clothes can make your creations more tactile and engaging.
- Customize the Size: Depending on the purpose of your Amigurumi, you can adjust the size of your creation by using a thicker or thinner yarn and a larger or smaller crochet hook.
- Create a Story: If you’re giving the Amigurumi as a gift, consider creating a story or character biography to go along with it. It can make the gift more personal and fun.
- Add a Signature: You could have a specific color, a unique stitch, or a little tag that you add to all your creations. It will become your “signature” and will make your Amigurumi immediately recognizable as yours.
- Try New Patterns: Don’t limit yourself to existing patterns. As you gain confidence, try designing your own Amigurumi. It can be a truly personalized and creative expression of your crochet skills.
Wash & Care Instructions
Taking care of your Amigurumi properly can help maintain its shape, color, and overall quality. Here are some general guidelines for washing and caring for your Amigurumi:
- Check Yarn Labels: The care instructions can vary depending on the type of yarn used. Always check the yarn labels for specific washing and drying instructions.
- Hand Washing: Hand washing is typically the safest option for Amigurumi. Fill a basin with cold or lukewarm water and add a gentle detergent. Submerge the toy and gently squeeze it to allow the soapy water to penetrate the fibers. Rinse thoroughly, making sure to squeeze out any soap residue.
- Drying: After washing, gently squeeze out excess water. Do not wring or twisting, which can distort the toy’s shape. Pat it dry with a towel to remove as much moisture as possible. Reshape the toy if necessary, and let it air dry completely. Avoid direct sunlight or heat sources, which can fade or damage the yarn.
- Machine Washing: Some amigurumi made with durable synthetic yarns can be washed gently with cold water. However, it is recommended to protect the toy in a pillowcase or laundry bag. Always air dry after machine washing.
- Spot Cleaning: Spot cleaning is often enough for small stains or spills. Use a cloth dampened with water and mild soap to clean the affected area gently.
- Avoid Bleach & Ironing: Bleach can damage or discolor the yarn. Also, avoid ironing your Amigurumi, as the heat can melt or damage synthetic fibers or flatten the toy.
- Regular Maintenance: To keep your Amigurumi looking fresh, give it a normal fluff by gently reshaping and brushing the surface with a soft brush.

A Quick Recap
You can probably tell, now, that the world of Amigurumi has so much potential! There are so many things you can do with just a few colored strings and the right guide! Amigurumi makes for a wonderful pastime; something to destress to, and allow your mind and imagination to run wild.
So why not try one of these patterns today and try your hand at creating something both wonderful, and incredibly soft and huggable!
Frequently Asked Questions
Is Amigurumi Difficult?
As with any other craft, amigurumi can be difficult to some who try it. Amigurumi has masters who can create amazing and mind-blowing dolls, but it is also incredibly accommodating to newcomers or those who have never tried the craft out at all!
Amigurumi creators will often create patterns and step-by-step guides to help you to create a massive number of things that you may not have otherwise known you could make! You could start right now, if you wanted, all you need is the right pattern and the right materials!
What Crochet Stitch Is Used In Amigurumi?
Amigurumi tends to normally be made by applying the single crochet method. This refers to the most basic form of crochet stitch, which involves a very simple method that can be learned very quickly.
Single crochet also has multiple applications elsewhere, so is a worthwhile skill to have even if you don’t plan to use it for amigurumi.
Is Crochet An Expensive Hobby?
Crochet can be an expensive hobby, depending on how often you do it. If you do it often and buy a large number of materials and tools to do it, then it could cost you a significant amount of money.
However, the materials needed to begin crocheting are inexpensive, and it would not cost you much to engage in the hobby with just a few materials!
Why Does My Circle Look More Like An Oval?
Make sure you’re evenly distributing your increases in the round. If you place them unevenly, your project might not take on a perfectly round shape.
What Should I Do If I Make A Mistake?
If you notice a mistake that can’t be easily hidden or adjusted, it’s often best to “frog” or undo your work to the point before the error occurs and start again from there.
How Do I Care For My Amigurumi Toy?
Most amigurumis can be spot-cleaned with mild soap and water. For deeper cleaning, follow the washing instructions for the specific yarn you used.

- 25 Delightful Crochet Jellyfish Patterns For Sea Lovers - April 17, 2024
- 75 Free Lovely Crochet Sweater Patterns (With Pictures) - February 9, 2024
- 50 Free Crochet Blanket Patterns For A Cozy Home - January 22, 2024